icon: LiNotebookThis is the "Overview" or Table of Content of AI Champions Bootcamp's Course Notes.
- How to use:
- 🔬 Zoom in and out using mouse scroll
- 👆🏼 Click on the colored header of the page to go to the page
- 🖱️ Quickly locate certain contents by scroll through the thumbnail to have a quick glance of the content
- 🔎 You can use the "search bar" on the top left of the screen to search our course notes too
Title: Embeddings
- Embeddings
- Handling Embeddings
- Applying Embeddings
- Retrieval Augmented Generation (RAG)
- Hands-on Walkthrough and Tasks

What is Embeddings
-
✦ Embeddings are a type of representation that bridges the human understanding of language to that of a machine.
- In the context of Large Language Models (LLMs), to be specific, we are dealing with text embeddings.
- There are other types of embeddings, such as image, audio, and video embeddings.
- Embeddings are a powerful technique in machine learning that allows us to represent data in a lower-dimensional space while preserving its semantic meaning.
- This approach has revolutionized various fields, including natural language processing (NLP), computer vision, and more.
-
✦ They are a distributed representation for text that is perhaps one of the key breakthroughs for the impressive performance of deep learning methods on challenging natural language processing problems.
-
Large language models like GPT-4, Gemini, or BERT use word embeddings as the first layer of the model. We know, BERT is not that "large" compared to the other two, but it's still considered a significant advancement in natural language processing.
-
These models convert each word into a dense vector and feed it into the model. The models then use these vectors to predict the next word in a sentence (in the case of GPT-4) or to understand the context of a word (in the case of BERT).
-
These models are trained on a large corpus of text, so they learn the semantic meaning of words. For example, the word “king” is closer in this space to “queen” than it is to “apple”.
-
They are representations of text in a N-dimensional space where words that have the same meaning have a similar representation.
- The text is translated into numbers, specifically into vectors.
- That's why we will often see some articles describe embeddings as vectors too.
- Essential, text embeddings is a vector (i.e., a list) of floating point numbers.
- In other words, it represents words in a coordinate system where related words, based on a corpus of relationships, are placed closer together.
-
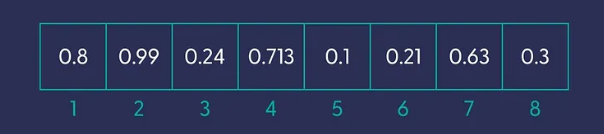
The number of values in a text embedding — known as its “dimension” — depends on the embedding technique (the process of producing the vector), as well as how much information you want it to convey.
-
The embeddings below shows a vector with 8 dimensions.
-
Table below show the common models with the dimensions of their embeddings
-
| Model | Embedding Dimension | Max Input Tokens |
|---|---|---|
| BERT-Base | 768 | 512 |
| BERT-Large | 1024 | 512 |
| GPT-2 | 768 | 1024 |
| GPT-3 | 768 | 2048 |
| RoBERTa-Base | 768 | 512 |
| RoBERTa-Large | 1024 | 512 |
| DistilBERT | 768 | 512 |
| OpenAI text-embedding-3-small | 1536 | 8191 |
| OpenAI text-embedding-3-large | 3072 | 8191 |
Visualize Embeddings
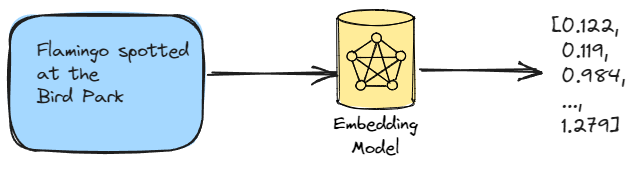
- ✦ Let’s try to visualize the concept. Imagine that we have a collection of sentences that we’ve turned into vectors, using a dense embedding technique.
- If we simplify these vectors with hundreds of dimensions to just two dimensions, which we can plot them on a similarly designed two-dimensional grid.
- For example, consider these seven pieces of text:
in_1 = "Flamingo spotted at the bird park"
in_2 = "Sea otter seen playing at the marine park"
in_3 = "Baby panda born at the city zoo"
in_4 = "Python developers prefer snake_case for variable naming"
in_5 = "New JavaScript framework aims to simplify coding"
in_6 = "C++ developers appreciate the power of OOP"
in_7 = "Java is a popular choice for enterprise applications"
list_of_input_texts = [in_1, in_2, in_3, in_4, in_5, in_6, in_7]
- ✦ Each of the 7 texts will converted into a vector (again, you can understand vector as list for our purpose). The diagram below shows the first text is converted into a vector. Imagine each of the 7 texts has it own vector that has 1536 numerical values. Here we assume we are using OpenAI's
text-embedding-3-small.
- ✦ The diagram below show graph after we simplified the 7 vectors down to 2 dimensions and plot them onto the x and y axes.
- Observe the distances between the different texts
- Although the text that starts with "Python developers prefer snake_case", contains two animals, the embedding is further away from the three data points that are truly talking about real animals
- It is closer to the other two data points that are about programming/coding

Why are Embeddings Important
-
✦ The straightforward reason is that they can reduce data dimensionality and address the primary issue: the necessity for speed.
- As AI’s capabilities continue to grow, scaling automation can face speed and cost constraints. This is where the recent rise in interest in Embeddings becomes significant.
- The main application of these technologies is the demand for speed, especially when processing large volumes of text data.
- This is particularly pertinent for large language models like the GPT series, whether they are closed or open-sourced, where the efficient processing of enormous amounts of text is vital.
- Embeddings serve as engineering tools to tackle the challenge of processing large-scale text swiftly and cost-effectively.
- As AI’s capabilities continue to grow, scaling automation can face speed and cost constraints. This is where the recent rise in interest in Embeddings becomes significant.
-
✦ The initial phase of any Large Language Model (LLM) training is the most crucial: the neural network is constructed from a vast amount of data with an extensive number of features (let’s refer to them as details).
- Language, of which the text is representing, contains many dimensions that are hard to specify or structurally quantify, including sentiment, grammar, meaning, and objects, just to mention a few.
- The more dimensions there are, the more challenging it is for computers to analyze and learn from the data. This is where embeddings come in.
- Data scientists employ embeddings to depict high-dimensional data in a low-dimensional space.
- Think of embeddings as summaries.
- They take high-dimensional data and condense it into a smaller, more manageable form, like picking out the key points from a long text.
- This makes it easier and faster for AI models to process and understand the information. Just like summarizing a book saves you time and effort, embeddings help AI models work more efficiently.
- Reducing the number of features while still capturing important patterns and relationships is the job of the Embeddings.
- They allow AI models to learn and make predictions faster and with less computing power.
- Language, of which the text is representing, contains many dimensions that are hard to specify or structurally quantify, including sentiment, grammar, meaning, and objects, just to mention a few.
Embeddings Are Evolving
Embedding models have been used for a long time, primarily for training other LLMs or ML models.
The introduction of Retrieval Augmented Generation (RAG) and subsequently of Vector Store Databases has shed new light on these models.
They have a few common issues:
- They have a context length limit, just like Large Language Models.
- They usually excel at only one language (English).
- High-dimensional vectors are typically required for optimal results.
- They are usually trained for a specific task (text, image, or audio).
As research progressed, new state-of-the-art (text) embedding models began producing embeddings with increasingly higher output dimensions, meaning each input text is represented using more values. While this improves performance, it comes at the cost of efficiency and speed. Researchers were therefore motivated to create embedding models whose embeddings could be reasonably reduced in size without significantly sacrificing performance.
icon: LiNotebookTitle: Applying Embeddings
- Embeddings
- Handling Embeddings
- Applying Embeddings
- Retrieval Augmented Generation (RAG)
- Hands-on Walkthrough and Tasks

Getting Embeddings
This is our new helper function to get embeddings by passing in a list of text to the function.
def get_embedding(input, model='text-embedding-3-small', dimensions=None):
response = client.embeddings.create(
input=input,
model=model,
dimensions=dimensions
)
return [x.embedding for x in response.data]
- ✦ The function can take in two different model
text-embedding-3-smallthat produces embeddings with 1536 dimensiontext-embedding-3-largethat produces embeddings with 3072 dimensions
Usage is priced per input token. Below is an example of how many pages of text that can be processed per US dollar (assuming ~800 tokens per page):
| MODEL | ~ PAGES PER USD DOLLAR | PERFORMANCE ON MTEB EVAL | MAX INPUT |
|---|---|---|---|
| text-embedding-3-small | 62,500 | 62.3% | 8191 |
| text-embedding-3-large | 9,615 | 64.6% | 8191 |
| text-embedding-ada-002 | 12,500 | 61.0% | 8191 |
OpenAI's Note on "Reducing Embedding Dimensions"
Using larger embeddings, for example storing them in a vector store for retrieval, generally costs more and consumes more compute, memory and storage than using smaller embeddings.
With OpenAI's new embedding models, both text-embedding-3-large and text-embedding-3-small allows builders to trade-off performance and cost of using embeddings.
-
✦ Specifically, builders can shorten embeddings (i.e. remove some numbers from the end of the sequence) without the embedding losing its concept-representing properties by passing in the
dimensionsAPI parameter. -
✦ For example, on the MTEB benchmark, a
text-embedding-3-largeembedding can be shortened to a size of 256 while still outperforming an unshortenedtext-embedding-ada-002(One of OpenAI's older embedding models) embedding with a size of 1,536. -
✦ In general, using the
dimensionsparameter when creating the embedding is the suggested approach. Code below shows how the helper function is called with the dimensions specified as 512.
# Helper Function for Getting Embeddings
def get_embedding(input, model='text-embedding-3-small', dimensions=None):
response = client.embeddings.create(
input=input,
model=model,
dimensions=dimensions
)
return [x.embedding for x in response.data]
# Calling the function
text = "Python developers prefer snake_case for variable naming"
embeddings = get_embedding(text, dimensions=512)
Visualizing Embeddings
- ✦ Visualizing data beyond three dimensions is inherently difficult due to our limited spatial intuition.
- When working with complex embeddings, such as Large Language Models (LLMs) or other high-dimensional representations, it becomes practically impossible to directly visualize them in their original form.
- One effective approach to make these embeddings more interpretable for humans is dimensionality reduction.
- Techniques like Principal Component Analysis (PCA) and Uniform Manifold Approximation and Projection (UMAP) allow us to compress the data into a lower-dimensional space, typically two dimensions, while preserving its intrinsic structure.
- By doing so, we can create scatter plots or heatmaps that reveal patterns, clusters, and relationships, making it easier for us to grasp the underlying information
Understanding UMAP
Uniform Manifold Approximation and Projection (UMAP) is a powerful dimensionality reduction technique that can be used to compress and visualize high-dimensional data in a lower-dimensional space.
- ✦ Unlike other dimensionality reduction techniques, UMAP preserves both the local and global structure of the data, making it an excellent tool for exploratory data analysis.
How Does UMAP Work?
UMAP operates in two main steps:
- In the first step, UMAP constructs a high-dimensional graph of the data.
- It does this by considering each data point and its nearest neighbors in the high-dimensional space.
- The distance between each point and its neighbors is calculated using a distance metric (such as Euclidean distance), and these distances are used to construct a weighted graph.
- In the second step, UMAP optimizes a low-dimensional graph to be as structurally similar as possible to the high-dimensional graph.
- It uses a force-directed graph layout algorithm to optimize the positions of the points in the low-dimensional space.
- The goal is to minimize the difference between the high-dimensional and low-dimensional representations of the data.
Why Use UMAP?
UMAP has several advantages over other dimensionality reduction techniques:
-
Preservation of Structure: UMAP preserves both the local and global structure of the data. This means that both clusters of similar data points and the broader relationships between these clusters are maintained in the lower-dimensional space.
-
Scalability: UMAP is highly scalable and can handle large datasets efficiently.
-
Flexibility: UMAP is not limited to just visualization. It can also be used for general non-linear dimension reduction tasks, making it a versatile tool for many data analysis tasks.
Using UMAP in Python
The UMAP algorithm is implemented in the umap-learn package in Python. Here's a simple example of how to use it:
import umap
import numpy as np
# Assume embeddings is your high-dimensional data
embeddings = np.random.rand(100, 50)
reducer = umap.UMAP()
umap_embeddings = reducer.fit_transform(embeddings)
In this example, umap.UMAP() creates a UMAP object, and fit_transform() fits the model to the data and then transforms the data to a lower-dimensional representation. The result, umap_embeddings, is a 2D array of the lower-dimensional embeddings of your data.
In conclusion, UMAP is a powerful tool for data analysts dealing with high-dimensional data. It offers a way to visualize and understand the structure of the data, making it an invaluable tool in the data analyst's toolkit.
Compare and contrast UMAP with PCA
You may have learnt about Principal Component Analysis (PCA) in Data Champions Bootcamp or other machine learning or statistical analysis courses. Here we try to understand why the UMAP is a superior technique compared to PCA, especially when it comes to complex data.
-
Linearity vs Non-linearity: PCA is a linear dimension reduction technique. It works well when the data lies along a linear subspace, but it may not capture complex structures in the data. On the other hand, UMAP is a non-linear dimension reduction technique. It can capture more complex structures in the data, making it more suitable for high-dimensional data where the structure is not linear.
-
Preservation of Structure: PCA aims to preserve the variance in the data. It projects the data onto the directions (principal components) where the variance is maximized. However, it does not preserve the distances between data points. UMAP, on the other hand, aims to preserve both the local and global structure of the data. It tries to maintain the distances between nearby points in the high-dimensional space in the lower-dimensional projection.
-
Scalability: PCA scales well with the number of features, but not with the number of samples. UMAP, however, scales well with both the number of features and the number of samples, making it more suitable for large datasets.
-
Interpretability: The principal components in PCA are combinations of the original features, which can be interpreted in terms of the original features. This is not the case with UMAP, as it uses a more complex algorithm to reduce dimensionality, which might not be as easily interpretable.
In summary, while PCA is a good choice for linear data and when interpretability is important, UMAP is more suitable for complex, high-dimensional data where preserving the structure of the data is crucial.
import numpy as np
import pandas as pd
import umap # For compressing high-dimensional data (many columns) into lower-dimensional data (e.g. 2 columns)
import matplotlib.pyplot as plt
import seaborn as sns # For data visualization
# New Helper Function
def get_projected_embeddings(embeddings, random_state=0):
reducer = umap.UMAP(random_state=random_state).fit(embeddings)
embeddings_2d_array = reducer.transform(embeddings)
return pd.DataFrame(embeddings_2d_array, columns=['x', 'y'])
def get_projected_embeddings(embeddings, random_state=0):- This line defines the function and its parameters.
- The function takes in two arguments: embeddings (your high-dimensional data) and random_state (a seed for the random number generator, which ensures that the results are reproducible).
reducer = umap.UMAP(random_state=random_state).fit(embeddings)- This line creates a UMAP object and fits it to your data.
- The fit method learns the structure of the data.
embeddings_2d_array = reducer.transform(embeddings)- This line transforms the high-dimensional data into a lower-dimensional space.
- The transformed data is stored in embeddings_2d_array.
return pd.DataFrame(embeddings_2d_array, columns=['x', 'y'])- This line converts the lower-dimensional data into a pandas DataFrame for easier manipulation and returns it.
- The DataFrame has two columns, 'x' and 'y', which represent the two dimensions of the reduced data.
Below is the example of using the new help function and then visualize its output using a scatterplot:
Understand Distance between Embeddings
Since embeddings capture semantic information, they allow us to compare a pair of texts based on their vector representations.
-
✦ One very common way to compare the distance between a pair of embeddings.
- The distance between two vectors measures their relatedness.
- Small distances suggest high relatedness
- Large distances suggest low relatedness.
-
✦ With the distance between a pair of embeddings, we can then apply the distance in many other use cases such as:
- Identify texts that semantically close to a target text, by identifying the texts that have short distance (i.e., closer) to the target text.
- identify outliers, by identifying the datapoints that furthest away from the rest of typical datapoints
- identify clusters, by grouping those datapoints that are located close to each other into distinct groups.
Cosine Similarity
Cosine similarity is one of the most common and often the default method used in calculating the distance between a pair of embeddings.
- ✦ It measures the cosine of the angle between two vectors.
- If the vectors are identical, the angle is 0 and the cosine similarity is 1.
- If the vectors are orthogonal, the angle is 90 degrees and the cosine similarity is 0, indicating no similarity.
- ✦ It quantifies how similar or aligned two vectors are in a high-dimensional space
- Mathematically, cosine similarity is calculated as the dot product of the two vectors, divided by the product of their magnitudes.
- Given two vectors A and B, the cosine similarity is calculated as:
- The implementation of the calculation in Python is as the following:
import numpy as np# Define two vectors A and B
A = np.array([1, 2, 3]) # Example vector A
B = np.array([4, 5, 6]) # Example vector B
# Define a function to calculate cosine similarity
def cosine_similarity(vector_a, vector_b):
# Calculate the dot product of A and B
dot_product = np.dot(vector_a, vector_b)
# Calculate the L2 norm (magnitude) of A and B
# **L2 norm** (also known as the **Euclidean norm**) of a vector is the square root of the sum of the squares of its components.
# - The Euclidean norm provides a straightforward measure of the magnitude of a vector.
# - It captures how “big” or “long” a vector is, regardless of its direction.
norm_a = np.linalg.norm(vector_a)
norm_b = np.linalg.norm(vector_b)
# Calculate cosine similarity
cosine_sim = dot_product / (norm_a * norm_b)
return cosine_sim
# Calculate and print the cosine similarity between A and B
cos_sim = cosine_similarity(A, B)
print(f"The cosine similarity between A and B is: {cos_sim}")
-
✦ In Python, you can use the
cosine_similarityfunction from thesklearn.metrics.pairwisemodule to calculate cosine similarity.- In the context of LLMs, we would often rely on LLM frameworks such as
Langchainthat handles the low-level operations such as calculating the distance behind the scene, while we can focus on the logics of our applications. - It's rare that we will need to write the python code for calculating
consine similarityon our own.
- In the context of LLMs, we would often rely on LLM frameworks such as
-
✦ Cosine similarity is particularly useful for LLM embeddings because it effectively captures the semantic similarity between text documents.
- It's robust to the high dimensionality of LLM embeddings and is relatively efficient to compute, making it a popular choice for measuring the distance between LLM embeddings.
-
✦ For production-level retriever that requires searching over many vectors quickly, it is generally suggested to use a vector database.
The Perils of Embeddings: Protecting Sensitive Information
While embeddings offer significant advantages in various applications, they also pose substantial risks to privacy and data security.
Embeddings are essentially numerical representations of text data, and despite their seemingly abstract nature, they can encode sensitive information about individuals or organizations.
Risk of Disclosing Embeddings
-
✦ Embeddings Contain Sensitive Information:
- Embeddings derived from sensitive data are equally sensitive.
- Despite their appearance as cryptic numbers, embeddings encode private details.
-
✦ Inversion Attacks:
- Researchers have demonstrated the ability to reverse-engineer embeddings back into their original text form through embedding inversion attacks.
- Attackers can exploit this technique to recover sensitive information from seemingly harmless numerical representations.
Handling Embeddings with Care:
-
✦ Privacy Implications:
- Organizations must acknowledge that embeddings are susceptible to privacy risks.
- Protecting embeddings is crucial, especially when they represent confidential information.
-
✦ Balancing Utility and Privacy:
- While embeddings enhance AI capabilities, it is essential to find a balance between utility and privacy.
- Robust security measures and awareness are necessary to prevent accidental information leakage.
icon: LiWrenchTitle: Applying Embeddings
- Embeddings
- Handling Embeddings
- Applying Embeddings
- Retrieval Augmented Generation (RAG)
- Hands-on Walkthrough and Tasks

Table of Contents
Use Cases of Embeddings
- ✦ Embeddings are commonly used for (but not limited to):
- Search (where results are ranked by relevance to a query string)
- Clustering (where text strings are grouped by similarity)
- Recommendations (where items with related text strings are recommended)
- Anomaly detection (where outliers with little relatedness are identified)
- Diversity measurement (where similarity distributions are analyzed)
- Classification (where text strings are classified by their most similar label)
- ✦ Therefore only the core part of the code is shown.
- ✦ We will go through the some of these use cases in detail in our Jupyter Notebook
- ✦ For use cases not covered in our Jupyter Notebook, you can find the detailed implementation by clicking on the links that are inserted at the end of each use cases below
- ✦ You don't need to understand the code in every use case below.
- The primary objective is for us to aware of what are the potential use cases of embeddings
- and have an intuition of how embeddings are used in such use cases
- You can delve deep into the use cases that are potentially relevant to your project
Here is the sample data used in the use cases below:
Semantic Search
To retrieve the most relevant documents we use the cosine similarity between the embedding vectors of the query and each document, and return the highest scored documents.
from openai.embeddings_utils import get_embedding, cosine_similarity
def search_reviews(df, product_description, n=3, pprint=True):
embedding = get_embedding(product_description, model='text-embedding-3-small')
df['similarities'] = df.ada_embedding.apply(lambda x: cosine_similarity(x, embedding))
res = df.sort_values('similarities', ascending=False).head(n)
return res
res = search_reviews(df, 'delicious beans', n=3)
Visualizing Complex Data
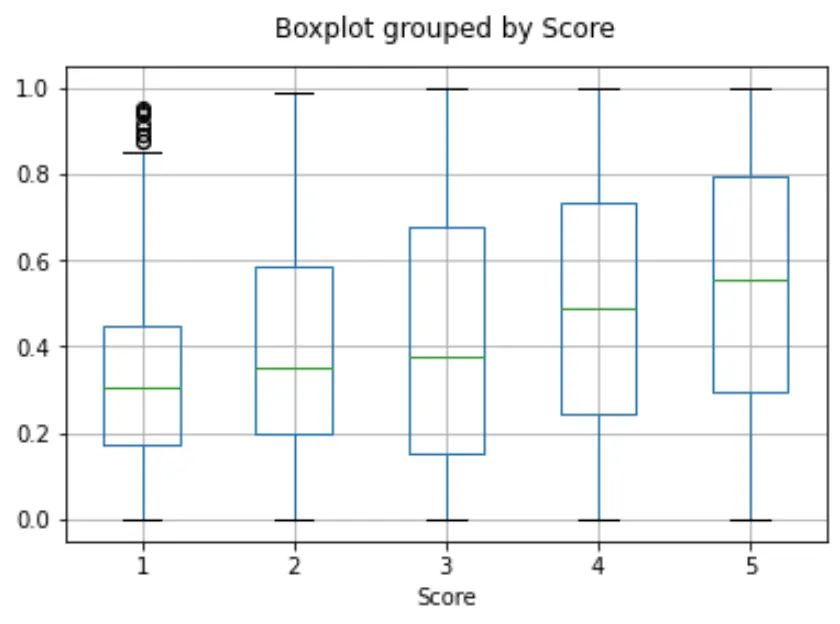
The size of the embeddings varies with the complexity of the underlying model. In order to visualize this high dimensional data we use the t-SNE algorithm to transform the data into two dimensions.
The individual reviews are coloured based on the star rating which the reviewer has given:
- • 1-star: red
- • 2-star: dark orange
- • 3-star: gold
- • 4-star: turquoise
- • 5-star: dark green
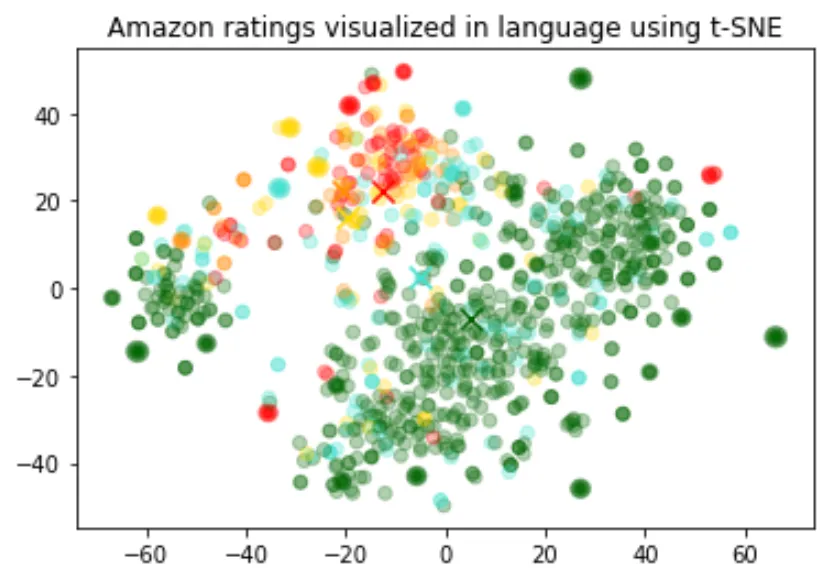
The visualization seems to have produced roughly 3 clusters, one of which has mostly negative reviews.
This code is a way to visualize the relationship between different Amazon reviews based on their embeddings and scores. The t-SNE algorithm is particularly good at preserving local structure in high-dimensional data, making it a popular choice for tasks like this.
import pandas as pd
from sklearn.manifold import TSNE
import matplotlib.pyplot as plt
import matplotlib
df = pd.read_csv('output/embedded_1k_reviews.csv')
matrix = df.ada_embedding.apply(eval).to_list()
# Create a t-SNE model and transform the data
tsne = TSNE(n_components=2, perplexity=15, random_state=42, init='random', learning_rate=200)
vis_dims = tsne.fit_transform(matrix)
colors = ["red", "darkorange", "gold", "turquiose", "darkgreen"]
x = [x for x,y in vis_dims]
y = [y for x,y in vis_dims]
color_indices = df.Score.values - 1
colormap = matplotlib.colors.ListedColormap(colors)
plt.scatter(x, y, c=color_indices, cmap=colormap, alpha=0.3)
plt.title("Amazon ratings visualized in language using t-SNE")
Embedding as a text feature encoder for ML algorithms
-
✦ An embedding serves as a versatile free-text feature encoder within a machine learning model.
- When dealing with free-text inputs, incorporating embeddings enhances the performance of any machine learning model.
- Additionally, embeddings can be employed as categorical feature encoders, especially when dealing with numerous and meaningful categorical variable names (such as job titles).
- Embeddings transform text into meaningful numerical representations that capture semantic relationships between words or phrases.
-
✦ Advantages over Traditional Methods:
- Superior to One-Hot Encoding: Imagine representing job titles like "Software Engineer" and "Data Scientist" with one-hot encoding. You'd end up with a sparse and high-dimensional vector space where these titles are treated as completely unrelated entities. Embeddings, however, can capture the inherent similarity between these roles, leading to better model performance.
- Overcoming Challenges of Direct NLP Processing: Traditional NLP techniques often involve complex pipelines with tasks like tokenization, stemming, and part-of-speech tagging. These pipelines can be brittle and computationally expensive. Embeddings offer a more efficient and robust alternative by condensing textual information into dense vectors.
-
✦ The provided code segment splits the data into a training set and a testing set, which will be utilized for regression and classification use cases
- The embeddings have been pre-calculated.
- If you are interested, see the details in Get_embeddings_from_dataset Notebook.
A) Use Embeddings as Feature(s) in a Regression Model
- ✦ Because the semantic information contained within embeddings is high, the prediction is likely to be decent even without large amounts of data.
- ✦ We assume that the score (the target variable) is a continuous variable between 1 and 5, and allow the algorithm to predict any floating point value.
B) Use Embeddings as Feature(s) in a Classification Model
-
✦ This time, instead of having the algorithm predict a value anywhere between 1 and 5, we will attempt to classify the exact number of stars for a review into 5 buckets, ranging from 1 to 5 stars.
-
✦ After the training, the model learns to predict 1 and 5-star reviews much better than the more nuanced reviews (2-4 stars), likely due to more extreme sentiment expression.
Zero-Shot Classification
We can use embeddings for zero shot classification without any labeled training data.
- ✦ For each class, we embed the class name or a short description of the class.
- ✦ To classify some new text in a zero-shot manner, we compare its embedding to all class embeddings and predict the class with the highest similarity.
from openai.embeddings_utils import cosine_similarity, get_embedding
df= df[df.Score!=3]
df['sentiment'] = df.Score.replace({1:'negative', 2:'negative', 4:'positive', 5:'positive'})
labels = ['negative', 'positive']
label_embeddings = [get_embedding(label, model=model) for label in labels]
def label_score(review_embedding, label_embeddings):
return cosine_similarity(review_embedding, label_embeddings[1]) - cosine_similarity(review_embedding, label_embeddings[0])
prediction = 'positive' if label_score('Sample Review', label_embeddings) > 0 else 'negative'
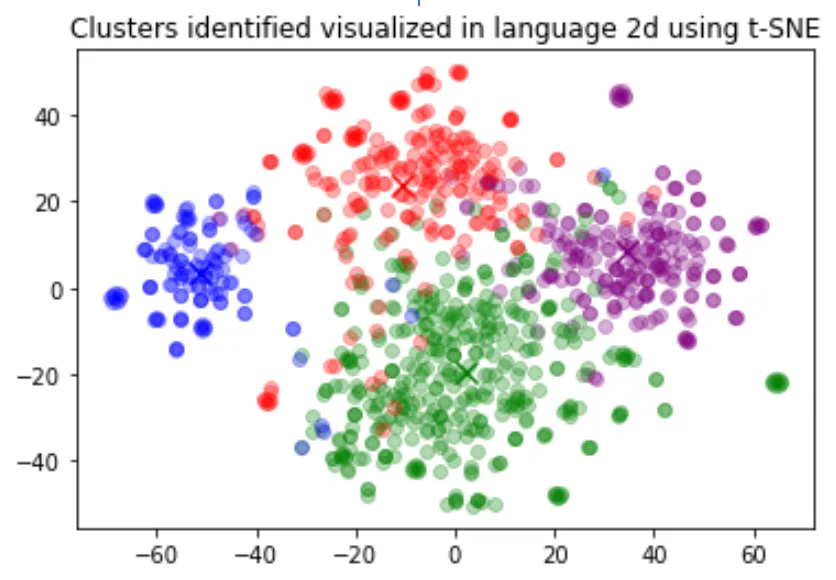
Clustering
Clustering is one way of making sense of a large volume of textual data. Embeddings are useful for this task, as they provide semantically meaningful vector representations of each text. Thus, in an unsupervised way, clustering will uncover hidden groupings in our dataset.
In this example, we discover four distinct clusters: one focusing on dog food, one on negative reviews, and two on positive reviews.
import numpy as np
from sklearn.cluster import KMeans
matrix = np.vstack(df.ada_embedding.values)
n_clusters = 4
kmeans = KMeans(n_clusters = n_clusters, init='k-means++', random_state=42)
kmeans.fit(matrix)
df['Cluster'] = kmeans.labels_
Recommendations
We can obtain a user embedding by averaging over all of their reviews. Similarly, we can obtain a product embedding by averaging over all the reviews about that product. In order to showcase the usefulness of this approach we use a subset of 50k reviews to cover more reviews per user and per product.
We evaluate the usefulness of these embeddings on a separate test set, where we plot similarity of the user and product embedding as a function of the rating. Interestingly, based on this approach, even before the user receives the product we can predict better than random whether they would like the product.
user_embeddings = df.groupby('UserId').ada_embedding.apply(np.mean)
prod_embeddings = df.groupby('ProductId').ada_embedding.apply(np.mean)
Why Can't I just use GPT-4 directly?
-
✦ After seeing some of these example use cases, you might think, “why should I care about these text embedding things? Can’t I just make use GPT-4 to analyze the text for me?
-
✦ Techniques like Retrieval Augmented Generated (RAG) or Fine-tuning allow tailoring the LLMs to specific problem domains.
-
✦ However, it’s important to recognize that these systems are still in their early stages. - Building a robust LLM system presents challenges such as high computational costs, security risks associated with large language models, unpredictable responses, and even hallucinations.
-
✦ On the other hand, text embeddings have a long history, are lightweight, and deterministic.
-
Leveraging embeddings simplifies and reduces the cost of building LLM systems while retaining substantial value. By pre-computing text embeddings, you can significantly accelerate the training and inference process of LLMs. This leads to lower computational costs and faster development cycles. Additionally, embeddings capture semantic and syntactic information about text, providing a strong foundation for LLM performance.
-
It should be another tool in the NLP toolkit, allowing for efficient similarity search, clustering, and other tasks. Embeddings excel at capturing semantic and syntactic relationships between texts. This makes them invaluable for tasks like finding similar documents, grouping related content, and understanding the overall structure of a text corpus. By combining embeddings with LLMs, you can create more powerful and versatile applications.
-
icon: LiWrenchTitle: Retrieval Augmented Generation (RAG)
- Embeddings
- Handling Embeddings
- Applying Embeddings
- Retrieval Augmented Generation (RAG)
- Hands-on Walkthrough and Tasks

Now that we understand how embeddings can be used to retrieve semantically related texts, it's time to explore probably the most popular and pragmatic application of embeddings: Retrieval Augmented Generation (RAG).
A Retrieval-Augmented Generation (RAG) system is a framework that enhances the accuracy and reliability of generative AI models by incorporating information from external sources.
Why Context Augmentation?
-
✦ LLMs offer a natural language interface between humans and data. Widely available models come pre-trained on vast amounts of publicly available data, such as Wikipedia, mailing lists, textbooks, source code, and more.
-
✦ However, while LLMs are trained on a vast amount of data, they are not trained on your data, which may be private or specific to the problem you’re trying to solve. This data could be behind APIs, in SQL databases, or trapped in PDFs and slide decks.
-
✦ You might choose to fine-tune an LLM with your data, but:
- Training an LLM is expensive.
- Due to the cost of training, it's difficult to update an LLM with the latest information.
- Observability is lacking. When you ask an LLM a question, it's not clear how the LLM arrived at its answer.
-
✦ Instead of fine-tuning, you can use a context augmentation pattern called Retrieval-Augmented Generation (RAG) to obtain more accurate text generation relevant to your specific data.
- RAG involves the following high-level steps:
- Retrieve information from your data sources first.
- Add it to your question as context.
- Ask the LLM to answer based on the enriched prompt.
- RAG involves the following high-level steps:
-
✦ By doing so, RAG overcomes all three weaknesses of the fine-tuning approach:
- There's no training involved, so it's inexpensive.
- Data is fetched only when you request it, ensuring it's always up-to-date.
- It's more explainable, as most RAG frameworks allow you to display the retrieved documents, making it more trustworthy.
Using Langchain for RAG

LangChain provides a robust framework for building LLM applications. The framework includes many components to support common LLM operations such as prompt chaining, chat memory management, and, of course, RAG.
We recommend using LangChain or equivalent frameworks for implementing RAG, instead of writing your code from scratch. These frameworks often offer the following benefits:
Ready-to-use Components
- ✦
Componentsare various modules/functions that we can use to handle many of the common operations in RAG, without having to write the code from scratch.- For example, Langchain provides components for us to easily read PDF files or PowerPoint files, connect to databases, or get the transcript of a YouTube video.
- ✦ Many of these components are based on contributions from large communities and research works that have proven to work effectively.
- For example, Langchain has a rich set of advanced techniques for retrieving relevant documents, such as
Contextual Compression,Self Query, andParent Document– techniques that otherwise someone would have to understand from research papers or code repositories and then translate into Python code.
- For example, Langchain has a rich set of advanced techniques for retrieving relevant documents, such as
- ✦ Using a framework like Langchain allows us to focus on the business and application logic, so we can efficiently build and evaluate our proof-of-concept prototypes.
Community Support:
- ✦ These popular frameworks like Langchain have active communities, providing tutorials, examples, and documentation.
- ✦ Whether you're a beginner or an experienced developer, you'll find resources to guide you.
However, packages like LangChain are not without their shortcomings:
-
✦ Expect a learning curve to get familiar with the framework
- While Langchain provides powerful tools for RAG, it does require some initial learning. Developers need to understand the components, syntax, and best practices.
-
✦ They are still in active development and may break your code
- Updates may introduce changes, deprecate features, or even cause backward compatibility issues.
- There are also chances where the documentation lags behind updates, or the available tutorials are based on older versions of the framework.
- The suggestion is to avoid changing the version of the installed package unless it's necessary and you're ready to fix any broken code.
-
✦ Less flexibility compared to writing your own code
- While Langchain streamlines RAG pipelines, it imposes certain constraints.
- Customization beyond the provided components may be limited or challenging.
- However, unless we are building something very unique, the components still serve as very useful building blocks for many common operations in LLMs.
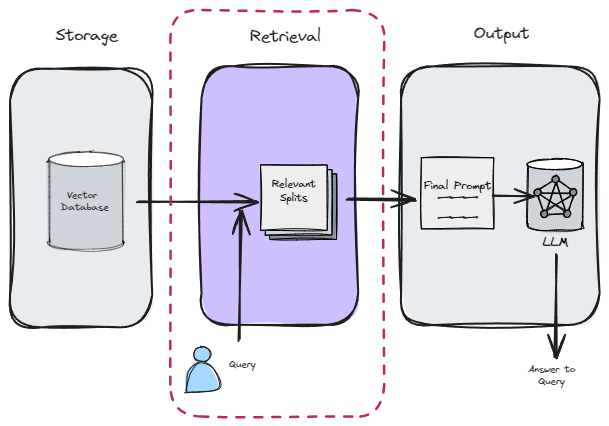
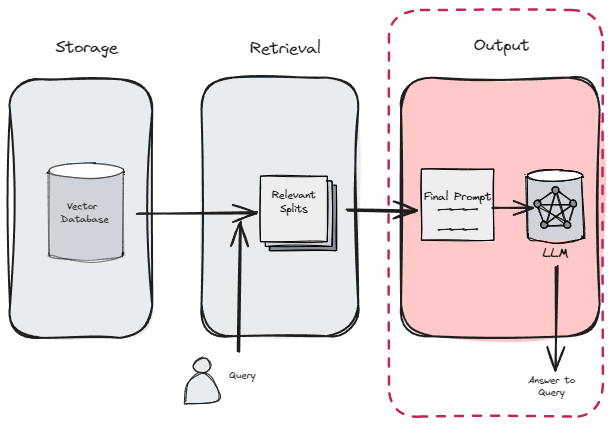
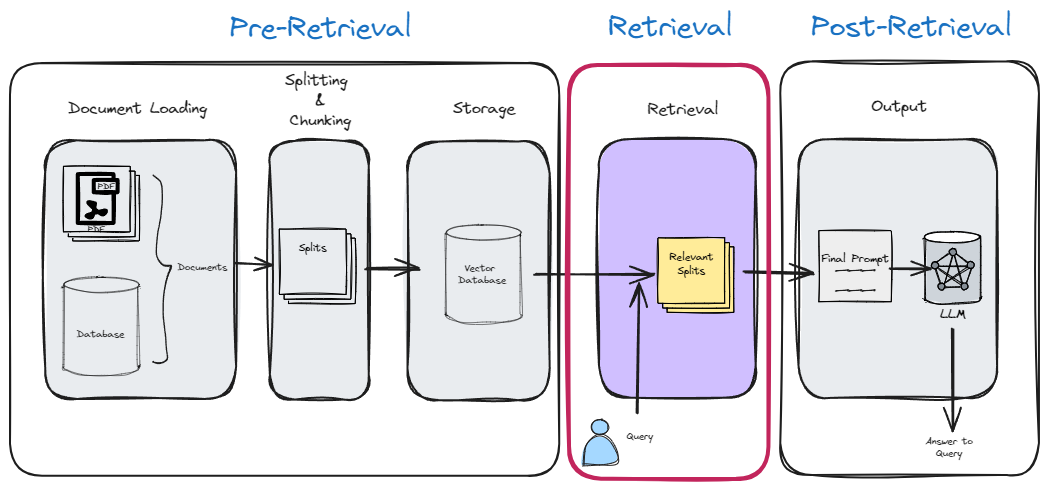
Overview of Steps in RAG
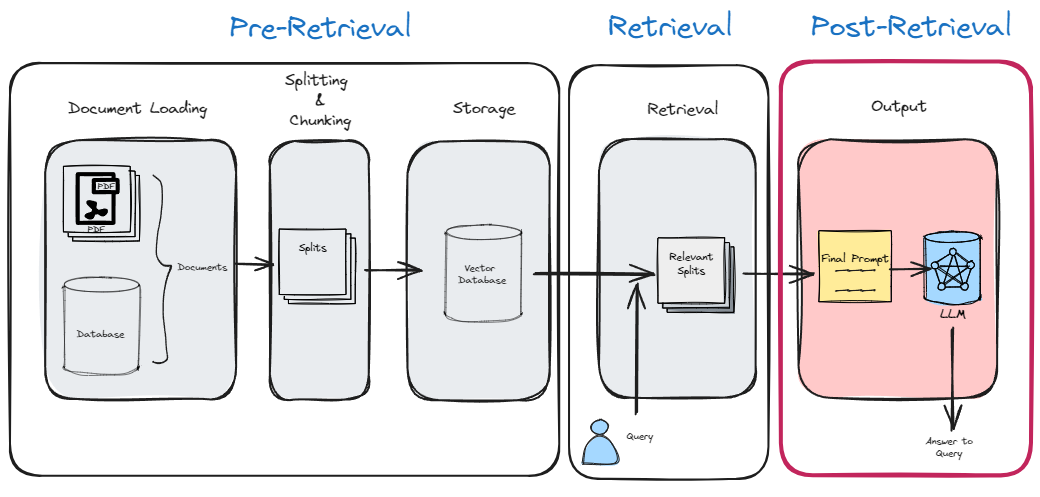
There are 5 main steps in a typical RAG pipeline:
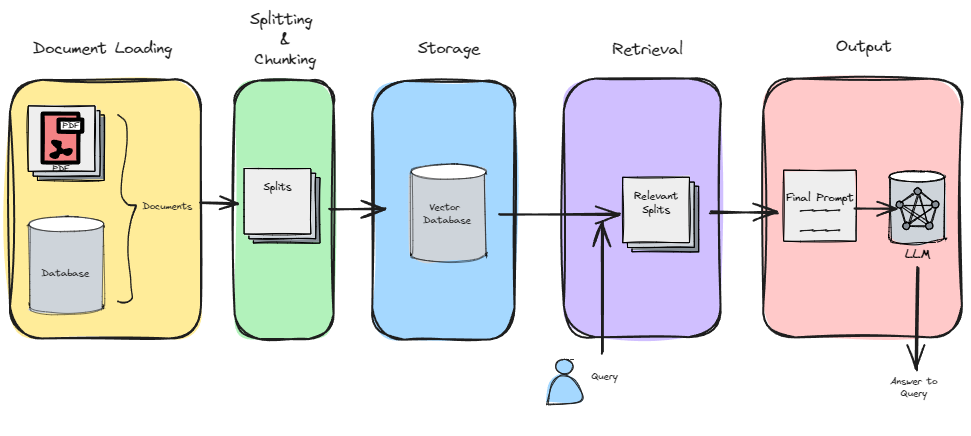
-
- Document Loading
- In this initial step, relevant documents are ingested and prepared for further processing.
-
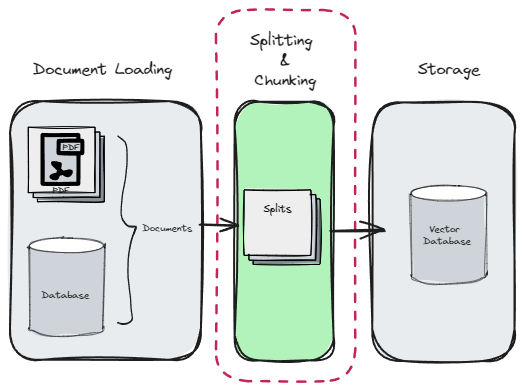
- Splitting & Chunking
- The text from the documents is split into smaller chunks or segments.
- These chunks serve as the building blocks for subsequent stages.
-
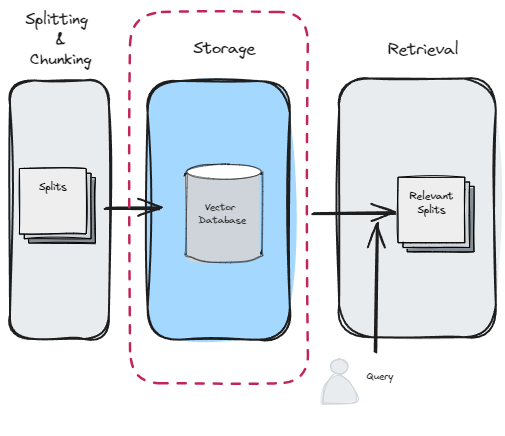
- Storage
- The embeddings (vector representations) of these chunks are created and stored in a vector store.
- These embeddings capture the semantic meaning of the text.
-
- Retrieval
- When an online query arrives, the system retrieves relevant chunks from the vector store based on the query.
- This retrieval step ensures that the system identifies the most pertinent information.
-
- Output
- Finally, the retrieved chunks are used to generate a coherent response.
- This output can be in the form of natural language text, summaries, or other relevant content.
1. Document Loading
-
✦ Use
document loadersto load data from a source as Document's.- A Document is a piece of text and associated metadata.
- For example, there are document loaders for loading a simple .txt file, for loading the text contents of any web page, or even for loading a transcript of a YouTube video.
-
✦ See official documentation on LangChain's Document Loaders for different kinds of loaders for different sources.
-
✦ In this particular example, we are using one of the
PDF loaderfromLangChainto load the Prompt Engineering Playbook.
from langchain.document_loaders import PyPDFLoader
loader = PyPDFLoader("https://www.developer.tech.gov.sg/products/collections/data-science-and-artificial-intelligence/playbooks/prompt-engineering-playbook-beta-v3.pdf")
pages = loader.load()
-
✦ The loader load each page of the PDF file as a separate
Documentobject. The code below shows the first page of the PDF, by using index 0.
2. Splits
Once we loaded documents, we'll often want to transform them to better suit our application.
-
✦ The simplest example is you may want to split a long document into smaller chunks that can fit into your model's context window.
-
✦ LangChain has a number of built-in document transformers that make it easy to split, combine, filter, and otherwise manipulate documents.
-
✦ At a high level, text splitters work as following:
- Split the text up into small, semantically meaningful chunks (often sentences).
- Start combining these small chunks into a larger chunk until you reach a certain size (as measured by some function).
- Once you reach that size, make that chunk its own piece of text and then start creating a new chunk of text with some overlap (to keep context between chunks).
-
✦ In the example, we are using the RecursiveCharacterTextSplitter from Langchain to split the given
some_textinto chunks. The resulting segments will have a maximum size of 26 characters, with an overlap of 4 characters between adjacent chunks.
The key parameters that we often see in splitter are the following:
chunk_size:- The
chunk_sizeparameter determines the maximum length (in characters) of each chunk or segment into which the document is split. - A smaller
chunk_sizeresults in more fine-grained segments, while a larger value creates larger chunks. - Adjusting this parameter affects the granularity of the split text.
- The
chunk_overlap:- The
chunk_overlapparameter specifies the number of characters that overlap between adjacent chunks. - It controls how much context is shared between neighboring segments.
- A higher
chunk_overlapvalue increases the overlap, allowing for smoother transitions between chunks. - Conversely, a lower value reduces overlap, potentially leading to more distinct segments.
- The
3. Storage
- ✦ Underlying the hood, there are two operations that happen at this step.
- Get the embeddings of the text
- Store the embeddings into a storage (a Vector store or a Vector Database)
- ✦ However, in frameworks such as LangChain, these two operations are often completed by a single
method.
from langchain_community.document_loaders import TextLoader
from langchain_text_splitters import CharacterTextSplitter
from langchain_community.vectorstores import Chroma
from langchain_openai import OpenAIEmbeddings
embeddings_model = OpenAIEmbeddings(model='text-embedding-3-small')
db = Chroma.from_documents(splitted_documents, embeddings_model, persist_directory="./chroma_db")
- ✦ The last line creates a Chroma database from a collection of splitted documents.
- The database is built using the specified embeddings model and is stored in the directory
“./chroma_db”. - Chroma: Chroma is a library or tool designed for efficient similarity search and indexing of such as text embeddings.
- from_documents: This method constructs a database from a list of
Documents objects(LangChain's object). - persist_directory: Specifies the directory where the database will be stored for future use.
- The database is built using the specified embeddings model and is stored in the directory
Vector Store:
- ✦ A Vector Store is a simple data structure or storage system designed specifically to hold vectors (n-dimensional numerical representations of data points).
- ✦ It focuses on efficient storage and retrieval of vectors without additional features.
- ✦ Purpose: Primarily used for vector indexing and retrieval, especially in scenarios where the primary goal is similarity search.
Vector Database:
- ✦ A Vector Database is a more sophisticated system that not only stores vectors but also provides additional functionalities and optimizations.
- ✦ It is purpose-built for handling high-dimensional vectors efficiently.
- ✦ Features:
- Indexing: Vector databases create indexes to speed up similarity searches.
- Scalability: They can handle large-scale vector data.
- Query Optimization: Vector databases optimize queries for similarity search.
- Machine Learning Integration: Some vector databases integrate with ML frameworks for training and inference.
- ✦ Examples: Pinecone, Milvus, and Weaviate are popular vector databases.
In short, while a Vector Store is minimalistic and focused on storage, a Vector Database provides additional features and optimizations for efficient vector handling, making it suitable for applications like semantic search, recommendation systems, and retrieval-augmented generation (RAG).
4. Retrieval
For the Retrieval stage, LangChain provides a variety of retrievers, each of which is an interface that returns documents given an unstructured query.
- ✦ Retrievers are more general than vector stores.
- ✦ A retriever does not need to be able to store documents, only to return (or retrieve) them.
- ✦ Vector stores can be used as the backbone of a retriever, but there are other types of retrievers as well.
- ✦ Retrievers accept a string query as input and return a list of
Documentobjects as output.
Method 1: Basic Retrieval Using Vector Store directly
This is a low-level implementation that is useful if you want to have more flexibility in customizable or developing your own retriever.
For example, if you want to only retrieve the documents of which the relevant_score is above a specific threshold value, this method allow you to access such values, therefore you can write your own code to do the filtering or other computations before getting the final list of documents to retrieve.
Method 2: Using the retriever object
This is a much more common approach, where we rely on the retriever component from Langchain to retrieve the relevant documents.
# This is a very basic retriever that return a maximum of 10 most relevant documents
retriever_basic = vectorstore.as_retriever(search_kwargs={"k": 10})
5. Output
from langchain.chains import RetrievalQA
qa_chain = RetrievalQA.from_chain_type(
AzureChatOpenAI(model='gpt-3.5-turbo'),
retriever=retriever_basic
)
qa_chain.invoke("Why LLM hallucinate?")
or we can also easily write our custom Q&A prompt for generating the answer
from langchain.prompts import PromptTemplate
# Build prompt
template = """Use the following pieces of context to answer the question at the end. If you don't know the answer, just say that you don't know, don't try to make up an answer. Use three sentences maximum. Keep the answer as concise as possible. Always say "thanks for asking!" at the end of the answer.
{context}
Question: {question}
Helpful Answer:"""
QA_CHAIN_PROMPT = PromptTemplate.from_template(template)
# Run chain
qa_chain = RetrievalQA.from_chain_type(
AzureChatOpenAI(model='gpt-3.5-turbo'),
retriever=retriever_basic,
return_source_documents=True, # Make inspection of document possible
chain_type_kwargs={"prompt": QA_CHAIN_PROMPT}
)
icon: RiCodeBoxLineTitle: Hands-on Walkthrough and Tasks
- Embeddings
- Handling Embeddings
- Applying Embeddings
- Retrieval Augmented Generation (RAG)
- Hands-on Walkthrough and Tasks
Download the Part 1 of the Notebook and Follow Along
- 👆🏽 Click on the "Open Notebook" button below to open the Jupyter Notebook
-
✦ This notebook contains pre-populated code for you to execute cell by cell.
- Working through it will help you solidify key concepts and techniques covered in the previous sections of this current topic..
-
✦ Here's how to use this notebook:
- Run each cell in order. Pay close attention to the code and the outputs it produces.
- Compare the outputs to your understanding. Do the results align with what you learned from the conceptual topics and notes? If not, revisit the relevant material or ask clarifying questions.
- Experiment! Once you've gone through the notebook once, don't stop there! Try these approaches to deepen your learning:
- Change the inputs: Modify the data, parameters, or prompts used in the code cells. How do these changes affect the outputs?
- Tweak the code itself: Experiment with small modifications to the provided code. Can you make it more efficient, add new functionality, or adapt it to a slightly different task? Active experimentation is the best way to master these concepts.

Complete the Part 2 of the Notebook with Your Own Code
[ Optional ] Share Your Work and Get Feedback from the Community
-
✦ While there is no submission required, we encourage you to share your solutions with your peers by pasting your link into the Sharing Board.
-
Feedback: By sharing your solutions, you can get insights, suggestions, and constructive criticism from your peers. This feedback can help you improve your approach and learn from others’ perspectives.
-
Learning from Peers: Since everyone may have different ways of solving problems, participating in these sessions allows you to see various approaches. You can learn alternative methods, explore different techniques, and gain a deeper understanding of the challenges.
-
-
✦ URL: https://miro.com/app/board/uXjVKojBjec=/?share_link_id=989058465513
-
✦ Passcode:
abc-2024
icon: RiMeteorLine
As we delve into the exciting world of Retrieval-Augmented Generation (RAG) and LangChain, building custom pipelines to extract knowledge from our documents, it's crucial to understand the broader landscape of RAG solutions. One such solution, particularly relevant for WOG officers, is AIBots.
While building your own RAG pipeline with LangChain offers immense flexibility and control, it's not always the most efficient or necessary approach. Here's why exploring AIBots alongside your LangChain learning journey can be incredibly beneficial:
1. Not All Use Cases Need a Custom Pipeline:
Before diving headfirst into building a complex RAG pipeline, ask yourself: does your use case truly warrant it? AIBots provides a user-friendly, no-code platform for creating RAG chatbots, perfect for simpler applications. It allows you to quickly test your documents and understand their limitations within a RAG context, saving you valuable time and effort.
2. AIBots as a Learning Tool:
Even if your use case ultimately requires a custom pipeline, AIBots serves as an excellent learning tool. By experimenting with different bot configurations, prompts, and knowledge bases, you gain valuable insights into the nuances of RAG. This hands-on experience will inform your custom pipeline development, leading to more effective and robust solutions.
3. WOG Central Platform within GCC:
AIBots is a Whole-of-Government (WOG) platform hosted within the Government Commercial Cloud (GCC). This means you don't have to worry about setting up infrastructure, managing security, or navigating bureaucratic hurdles. It's a ready-to-use platform, allowing you to focus on exploring RAG and building your chatbot.
4. Understanding Limitations:
By using AIBots, you can quickly identify the limitations of your documents within a RAG context. This includes understanding how well the LLM can extract information, potential biases in the data, and the impact of document structure on response accuracy. These insights are invaluable when designing your custom pipeline, allowing you to address potential challenges upfront.
5. Community and Support:
AIBots platform has a vibrant community of users within WOG. This provides a valuable resource for sharing knowledge, best practices, and troubleshooting tips. Additionally, the AIBots team offers support and guidance, ensuring a smooth learning experience.
In conclusion, while mastering LangChain and building custom RAG pipelines is a valuable skill, understanding the role of AIBots within the RAG ecosystem is equally important.
It offers a quick and easy way to test your use cases, learn the fundamentals of RAG, and leverage a secure, readily available platform within the GCC.
Topic 4 - From Embeddings from Applications
Go to Part 1 of the Index from here index
icon: LiWrenchTitle: RAG Evaluation
- Deep Dive into RAG
- Improving Pre-Retrieval Processe
- Improving Retrieval Processed
- Improving Post-Retrieval Processed
- RAG Evaluation
- Further Reading: WOG RAG Playbook
Table of Contents
Intro
-
✦ As there are so many ways to tune our RAG pipelines, how would we know which of the changes actually lead to better performance?
-
✦ Ragas is one of the frameworks designed to assess RAG-based applications.
- It is a framework that provides us with the necessary ingredients to help us evaluate our RAG pipeline on a component level.
- Ragas provides you with the tools based on the latest research for evaluating LLM-generated text to give you insights about your RAG pipeline.

-
✦ What’s interesting about Ragas is that it started out as a framework for “reference-free” evaluation. That means, instead of having to rely on human-annotated ground truth labels in the evaluation dataset, Ragas leverages LLMs under the hood to conduct the evaluations.
-
✦ To evaluate the RAG pipeline, Ragas expects the following information:
question: The user query that is the input of the RAG pipeline.answer: The generated answer from the RAG pipeline.contexts: The contexts retrieved from the external knowledge source used to answer thequestion.ground_truths: The ground truth answer to thequestion. This is the only human-annotated information. This information is only required for some of the matrices.
-
✦ Leveraging LLMs for reference-free evaluation is an active research topic.
- While using as little human-annotated data as possible makes it a cheaper and faster evaluation method, there is still some discussion about its shortcomings, such as bias.
- However, some papers have already shown promising results. If you are interested, you can read more on the “Related Work” section of this Ragas paper.
-
-
✦ Note that the framework has expanded to provide metrics and paradigms that require ground truth labels (e.g.,
context_recallandanswer_correctness) -
✦ Additionally, the framework provides you with tooling for automatic test data generation.
Evaluation Metrics
Ragas provides you with a few metrics to evaluate a RAG pipeline component-wise as well as from end-to-end.
On a component level, Ragas provides you with metrics to evaluate the retrieval component (context_relevancy and context_recall) and the generative component (faithfulness and answer_relevancy) separately.
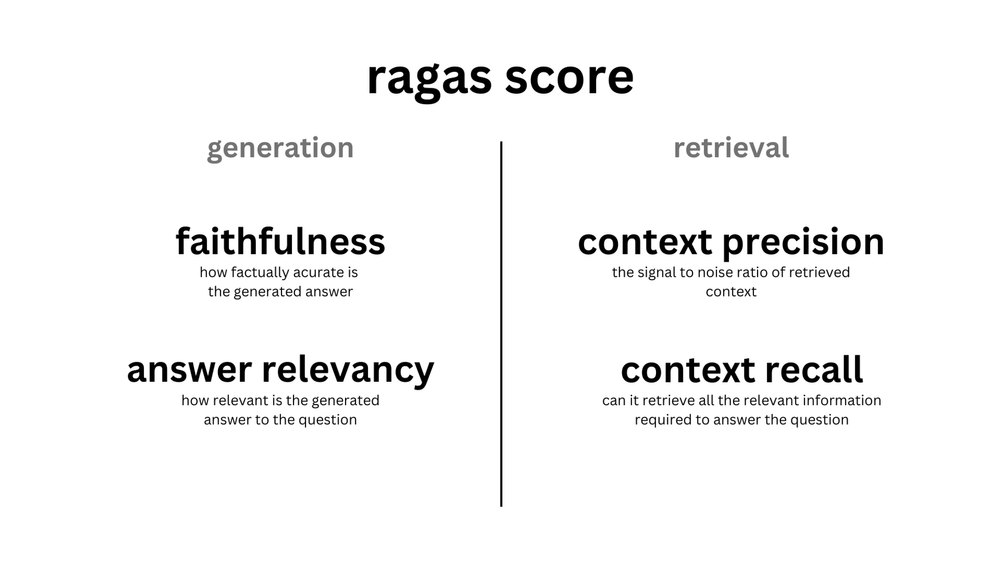
Most (if not all of) metrics are scaled to the range between 0 and 1, with higher values indicating a better performance.
Ragas also provides you with metrics to evaluate the RAG pipeline end-to-end, such as answer semantic similarity and answer correctness.
Installation
pip install ragas
Quick Start
from datasets import Dataset
import os
from ragas import evaluate
from ragas.metrics import faithfulness, answer_correctness
os.environ["OPENAI_API_KEY"] = "your-openai-key"
data_samples = {
'question': ['When was the first super bowl?', 'Who won the most super bowls?'],
'answer': ['The first superbowl was held on Jan 15, 1967', 'The most super bowls have been won by The New England Patriots'],
'contexts' : [['The First AFL–NFL World Championship Game was an American football game played on January 15, 1967, at the Los Angeles Memorial Coliseum in Los Angeles,'],
['The Green Bay Packers...Green Bay, Wisconsin.','The Packers compete...Football Conference']],
'ground_truth': ['The first superbowl was held on January 15, 1967', 'The New England Patriots have won the Super Bowl a record six times']
}
dataset = Dataset.from_dict(data_samples)
score = evaluate(dataset,metrics=[faithfulness,answer_correctness])
score.to_pandas()
Visit the documentation here: Introduction | Ragas
icon: LiLampDeskTitle: Further Readings
- Deep Dive into RAG
- Improving Pre-Retrieval Processe
- Improving Retrieval Processed
- Improving Post-Retrieval Processed
- RAG Evaluation
- Further Reading: WOG RAG Playbook
Table of Contents
GovTech RAG Playbook
The Retrieval-Augmented Generation (RAG) Playbook is a comprehensive guide designed to help developers, particularly in Whole of Government (WOG), navigate the complexities of building and deploying RAG systems.
This playbook offers practical advice on constructing RAG applications, from no-code/low-code solutions to custom pipelines using open-source frameworks. It also provides metrics for evaluating RAG systems and includes experiments on realistic government use cases to demonstrate how to iteratively improve RAG performance.
As RAG technology evolves, this playbook serves as a foundational resource for understanding and leveraging its capabilities effectively.

Conceptual Guide for Retrieval Techniques in RAG
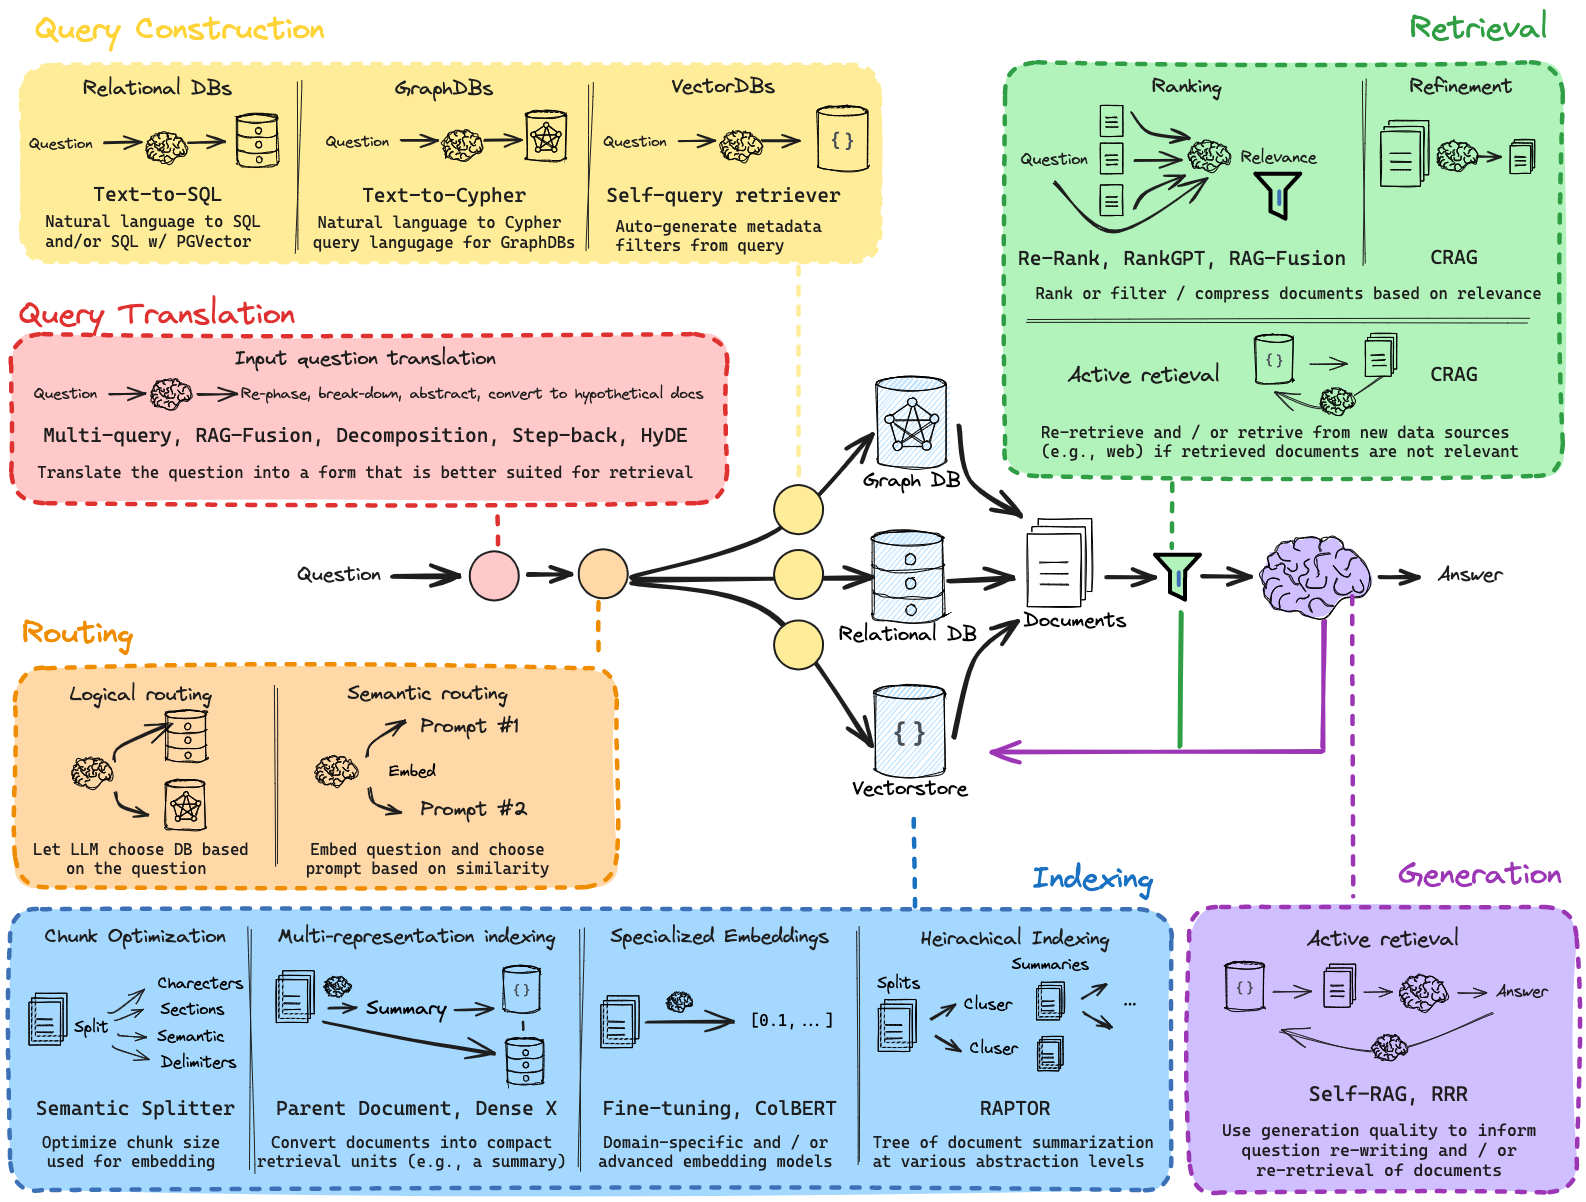
RAG is only as good as the retrieved documents’ relevance and quality. Fortunately, an emerging set of techniques can be employed to design and improve RAG systems. The guide has focused on grouping and summarizing many of these techniques (see below above) and will share some high-level strategic guidance in the guide. Developers or builders can and should experiment with using different pieces together.
icon: LiWrenchTitle: Improving Retrieval Processes
- Deep Dive into RAG
- Improving Pre-Retrieval Processe
- Improving Retrieval Processed
- Improving Post-Retrieval Processed
- RAG Evaluation
- Further Reading: WOG RAG Playbook
1 Overview
-
✦ The “Retrieval” step is key since it directly improves the context that the LLM has when generating a response.
- It is the process whereby we are retrieve relevant context for a given query from the vector store or other databases.
- Instead of using normal document chunk index retrieval we can use some modified methods which can be more efficient and give better contextual retrieval.
-
✦ The methods we will cover below are:
- **Parent-Child Index Retrieval
- Hierarchical Summary Index Retrieval
- Self-Query Retriever
2 Parent - Child Index Retrieval
-
✦ Consider that we've developed a RAG system designed to identify potential diseases based on the symptoms entered during a consultation. If we're working with a Naive RAG, it's possible that it might only identify diseases sharing one or two symptoms, which could somewhat show that our application is not useful or even unusable.
-
✦ This scenario is perfectly suited for employing the Parent-Child Index Retrieval method.
- This approach involves dividing large segments (referred to as the parent chunk) into smaller segments (known as the child chunk).
- The advantage of creating smaller segments is that the information within them becomes more concentrated, ensuring that its value is not lost across extensive text passages.
-
✦ However, there's a minor issue with this approach:
- To accurately locate the most pertinent documents, it's necessary to segment our documents into smaller pieces.
- Conversely, it's crucial to supply the Large Language Model (LLM) with adequate context, which is best achieved by using larger segments.
The above points are illustrated in the subsequent image:
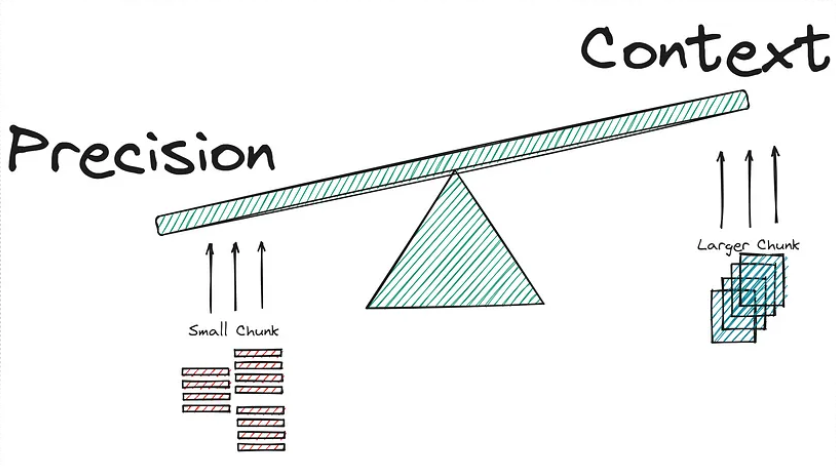
-
✦ The dilemma seems inescapable:
- Embedding a shorter context allows the RAG to focus on more specific meaning but forgoes the broader context in the surrounding text. Embedding longer text, such as the entire body of text focuses on the overall meaning but may dilute the significance of individual sentences or phrases.
-
✦ This is where the Parent-child index retrieval method comes into play, promising to improve our approach.
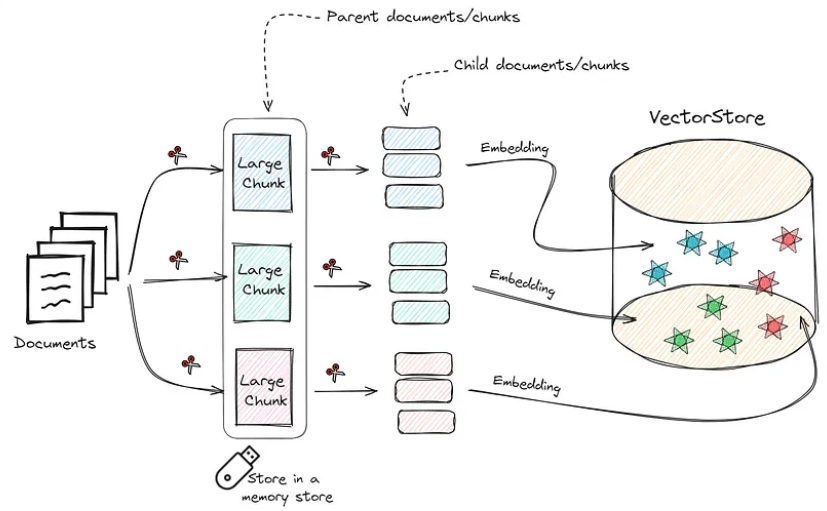
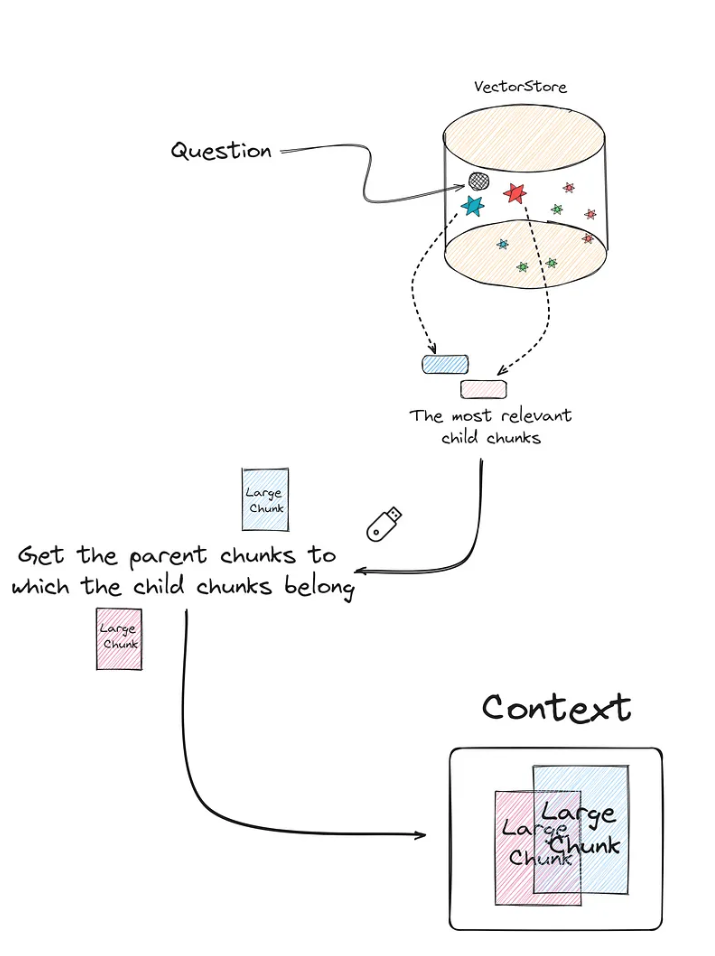
- The core concept involves subdividing the larger segments (Parent chunks/documents) into smaller ones (Child Chunks/documents).
- After this subdivision, the process entails searching for the most relevant top K documents using the child chunks, then retrieving the parent chunks associated with these top K child documents.
-
✦ To bring this concept into practical application, a step-by-step explanation is most effective:
- Collect the documents and segment them into larger chunks (Parent chunks).
- Divide each parent chunk to generate smaller, child chunks.
- Store the child chunks (in their Vector Representation) within the Vector Store.
- Keep the parent chunks stored in memory (Vector representation for these is not necessary).
The process described is visually represented in the following image:
-
✦ To better understand this method, consider the following image that illustrates how it operates:
-
✦ Implementing this might sound daunting due to the need to establish a new database for the smaller chunks, maintain the parent chunks in memory, and track the relationship between parent and child chunks. Fortunately,
LangChainsimplifies this process significantly, making it straightforward to set up.
from langchain.retrievers import ParentDocumentRetriever
from langchain.storage import InMemoryStore
from langchain_text_splitters import RecursiveCharacterTextSplitter
from langchain_openai import OpenAIEmbeddings
from langchain_chroma import Chroma
# Some code for loading the documents are obmitted
# ...
parent_docs = documents
# Embedding Model
embeddings = OpenAIEmbeddings(model="text-embedding-3-small")
# Splitters
child_splitter = RecursiveCharacterTextSplitter(chunk_size=200)
parent_splitter = RecursiveCharacterTextSplitter(chunk_size=800)
# Stores
store = InMemoryStore()
vectorstore = Chroma(embedding_function=embeddings, collection_name="fullDoc", persist_directory="./JohnWick_db_parentsRD")
parent_document_retriever = ParentDocumentRetriever(
vectorstore=vectorstore,
docstore=store,
child_splitter=child_splitter,
parent_splitter =parent_splitter
)
- ✦ Do note that the number of chunks in the vector store (number of child chunks) should be much higher than the number of documents stored in memory (parent chunks). With the following code we can if this is true:
print(f"Number of parent chunks is: {len(list(store.yield_keys()))}")
print(f"Number of child chunks is: {len(parent_document_retriever.vectorstore.get()['ids'])}")
'''
Number of parent chunks is: 75
Number of child chunks is: 3701
'''
Once we have our Parent Document Retriever, we just need to create our RAG based on this retriever and that would be it.
setup_and_retrieval = RunnableParallel({"question": RunnablePassthrough(), "context": parent_document_retriever })
output_parser = StrOutputParser()
parent_retrieval_chain = setup_and_retrieval | rag_prompt | chat_model | output_parser
LangChain Documentation: Parent Document Retriever | 🦜️🔗 LangChain
3 Hierarchical Summary Index Retrieval
-
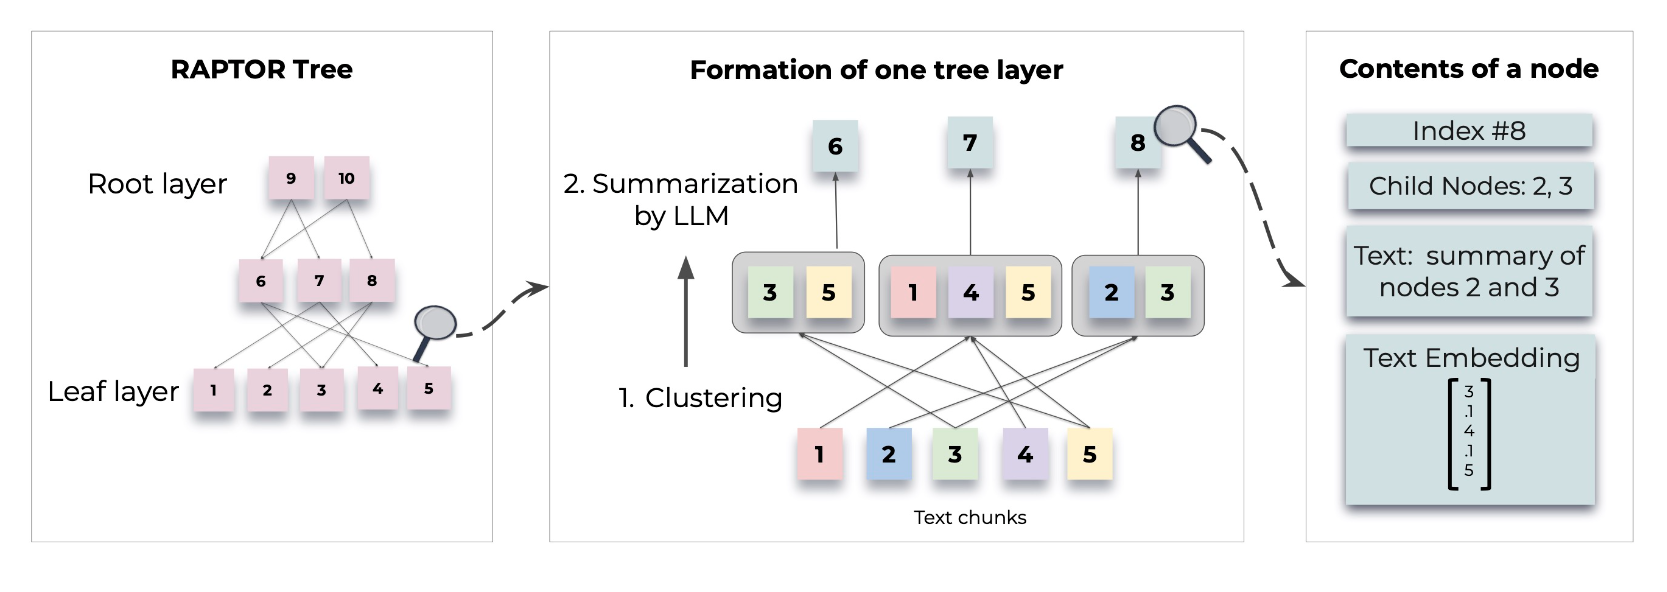
✦ This approach can be understood as the reversal of Parent-Child Index Retrieval that we just discussed above. It is also a more intelligent method as it takes into consideration the "semantic meaning of the child chunks" and groups semantically-similar child chunks together.
-
✦ RAPTOR is one of the hierarchical approach introduced by Stanford researchers.
- RAPTOR introduces a novel approach to retrieval-augmented language models by constructing a recursive tree structure from documents
- This allows for more efficient and context-aware information retrieval across large texts, addressing common limitations in traditional language models
-
✦ Based on user query, the summary document is retrieved and then relevant chunks are retrieved from that document.
# Intallation
!git clone https://github.com/parthsarthi03/raptor.git
!cd raptor
!pip install -r requirements.txt
# Setting Up
import os
os.environ["OPENAI_API_KEY"] = "your-openai-api-key"
from raptor import RetrievalAugmentation
RA = RetrievalAugmentation()
# Adding Documents
with open('sample.txt', 'r') as file:
text = file.read()
RA.add_documents(text)
- ✦ For detailed methodologies and implementations, refer to the original paper or the GitHub repo:
3 Self-Query Retriever
-
✦ Its main feature is that it is capable of performing searches in the vector store, applying filters based on the metadata. This approach is allegedly one of the most optimal methods to improve the efficiency of the retriever.
-
✦ We know that when we apply a “Naive retrieval”, we are calculating the similarity of all the chunks of the vector database with the query.
- The more chunks the vector store has, the more similarity calculations will have to be done.
- Now, imagine being able to do a prior filter based on the metadata, and only after selecting the chunks that meet the conditions imposed in relation to the metadata, we calculate similarity scores based on the filtered chunks.
- This can drastically reduce computational and time cost.
-
✦ Let’s look at a use case to fully understand when to apply this type of retreival.
- Let’s imagine that we have stored in our vector database a large number of experiences and leisure offers.
- The description of the experience is what we have encoded, using our embedding model.
- Each offer has 3 key values or metadata:
- Date
- price
- place.
- Let’s imagine that a user is looking for an experience below:
- An experience close to nature that is safe and family-friendly.
- Furthermore, the price must be less than $50 and the place must be in California.
- Therefore, it does not make sense to calculate similarities with chunks/experiences that do not comply with the metadata filter (which is based on the requirements by the user).
- Let’s imagine that we have stored in our vector database a large number of experiences and leisure offers.
-
✦ This case is ideal for applying Self Query Retriever.
- What this type of retriever allows us to do is perform a first filter through the metadata
- Only then do we perform the similarity calculation between the chunks that meet the metadata requirements and the user input.
This technique can be summarized in two very specific steps:
- Query Constructor
- Query Translater
3.1 Query Constructor
-
✦ The objective of the step called “Query Constructor” is to create the appropriate query and filters according to the user input.
-
✦ Who is in charge of applying the corresponding filters and how do you know what they are? For this we are going to use an LLM.
- This LLM will have to be able to decide which filters to apply and when.
- We will also have to explain beforehand what the metadata is and what each of them means.
- In short, the prompt must contain 3 key points:
- Context: Personality, how you should act, output format, etc.
- Metadata: Information about available metadata.
- Query: The user’s query/input/question.
-
✦ The output generated by the LLM cannot be directly entered into the database.
- Therefore, the so-called “Query Translater” is needed.
3.2 Query Translater
- ✦ This is a module in charge of translating the output of the LLM (Query Constructor) into the appropriate format to perform the query.
- Depending on the vector database you use, you may have to use different types of query translators.
- As usual, we will use Chroma db, therefore, we need a translator built specifically for this database.
LangChainhas specific database translators for almost all of the databases.
-
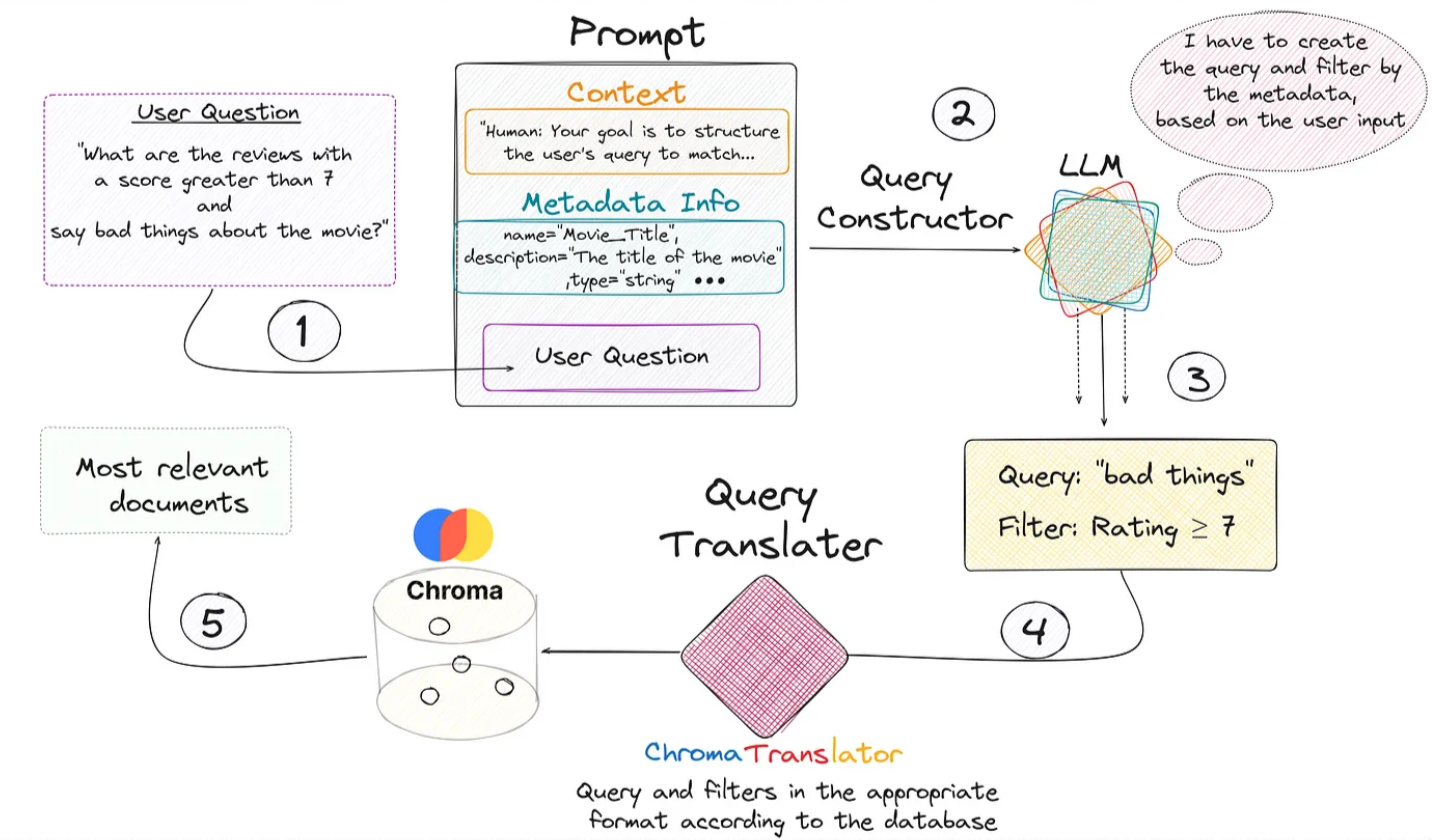
✦ From the previous image, we see that everything begins with the user’s query.
- We create the prompt that contains the 3 key fields and is introduced to the LLM that generates a response with two key fields: “Query” and “Filter”.
- This is fed into the query translator which translates these two fields into the correct format needed by Chroma DB.
- Performs the query and returns the most relevant documents based on the user’s initial question.
-
✦ It is very important to provide the LLM with a detailed description of the metadata available in the vector store. This is shown through the following piece of code:
from langchain_chroma import Chroma
from langchain_core.documents import Document
from langchain_openai import OpenAIEmbeddings
docs = [
Document(
page_content="A bunch of scientists bring back dinosaurs and mayhem breaks loose",
metadata={"year": 1993, "rating": 7.7, "genre": "science fiction"},
),
Document(
page_content="Leo DiCaprio gets lost in a dream within a dream within a dream within a ...",
metadata={"year": 2010, "director": "Christopher Nolan", "rating": 8.2},
),
Document(
page_content="A psychologist / detective gets lost in a series of dreams within dreams within dreams and Inception reused the idea",
metadata={"year": 2006, "director": "Satoshi Kon", "rating": 8.6},
),
Document(
page_content="A bunch of normal-sized women are supremely wholesome and some men pine after them",
metadata={"year": 2019, "director": "Greta Gerwig", "rating": 8.3},
),
Document(
page_content="Toys come alive and have a blast doing so",
metadata={"year": 1995, "genre": "animated"},
),
Document(
page_content="Three men walk into the Zone, three men walk out of the Zone",
metadata={
"year": 1979,
"director": "Andrei Tarkovsky",
"genre": "thriller",
"rating": 9.9,
},
),
]
vectorstore = Chroma.from_documents(docs, OpenAIEmbeddings())
- ✦ Now we can instantiate our retriever.
- To do this we’ll need to provide some information upfront about the metadata fields that our documents support and a short description of the document contents.
- Besides, we need define our retriever to include the following information:
- The LLM to use
- The embedding model to be used
- The vectorstore to be accessed
- A description of the information in the documents of this vector base.
- The metadata description
- The Query translator you want to use
from langchain.chains.query_constructor.base import AttributeInfo
from langchain.retrievers.self_query.base import SelfQueryRetriever
from langchain.retrievers.self_query.chroma import ChromaTranslator
from langchain_openai import ChatOpenAI
metadata_field_info = [
AttributeInfo(
name="genre",
description="The genre of the movie. One of ['science fiction', 'comedy', 'drama', 'thriller', 'romance', 'action', 'animated']",
type="string",
),
AttributeInfo(
name="year",
description="The year the movie was released",
type="integer",
),
AttributeInfo(
name="director",
description="The name of the movie director",
type="string",
),
AttributeInfo(
name="rating", description="A 1-10 rating for the movie", type="float"
),
]
document_content_description = "Brief summary of a movie"
embeddings = OpenAIEmbeddings(model="text-embedding-3-small")
chat_model = ChatOpenAI()
self_query_retriever = SelfQueryRetriever.from_llm(
llm=ChatOpenAI(temperature=0),
vectorstore =vectordb,
document_contents = document_content_desription,
metadata_field_info =metadata_field_info,
verbose = True,
structured_query_translator = ChromaTranslator()
)
LangChain Documentation: Self-querying | 🦜️🔗 LangChain
This note is not intended to exhaustively cover all techniques or methods available for improving Retrieval-Augmented Generation (RAG) processes.
- RAG is a field under active research and progresses rapidly.
- Readers are encouraged to stay informed about other techniques and methods in the field to gain a comprehensive understanding of the advancements and innovations that continue to emerge.
icon: LiWrenchTitle: Improving Post-Retrieval Processes
- Deep Dive into RAG
- Improving Pre-Retrieval Processe
- Improving Retrieval Processed
- Improving Post-Retrieval Processed
- RAG Evaluation
- Further Reading: WOG RAG Playbook
1 Overview
- Once we have efficiently retrieved the context for a given query, we can further refine and optimize It to improve its relevance for a more optimal generation of the output answer.
2 Re-Ranking of Retrieved chunks/context
-
✦ Re-ranking is a process of ordering the retrieved context chunks in the final prompt based on its score and relevancy.
-
✦ This is important as researchers found better performance when the most relevant context is positioned at the start of the prompt.
-
✦ **The technique consists of two very different steps:
- Step 1:
- Get a good amount of relevant docs based on the input/question. Normally we set the most relevant K.
- For the first step, it is nothing more than what we usually use to make a basic RAG.
- Vectorize our documents. vectorize the query and calculate the similarity with any metric of our choice.
- Step 2:
- Recalculate which of these documents are really relevant.
- Discarding the other documents that are not really useful.
- Re-order the relevant documents
- The second step is something different from what we are used to seeing. This recalculation/reranking is executed by the reranking model or cross-encoder.
- Step 1:

- ✦ You will have realized that the two methods provide the same result in the end, which is a metric that reflects the similarity between two texts. But there is a very important difference.
- ✦ You may ask. If it works better, why don’t we just use cross encoder directly with all chunks, instead of just limiting it to the top-K chunks? This is because:
- it would be terribly expensive and causes heavy computation which lead to slowness.
- For this reason, we make a first filter of the chunks closest in similarity to the query, reducing the use of the reranking model to only K times.
We can notice that each new query, the similarity of the query with each of the documents needs to be calculated.
- ✦ To better understand the architecture of this method, let’s look at a visual example.
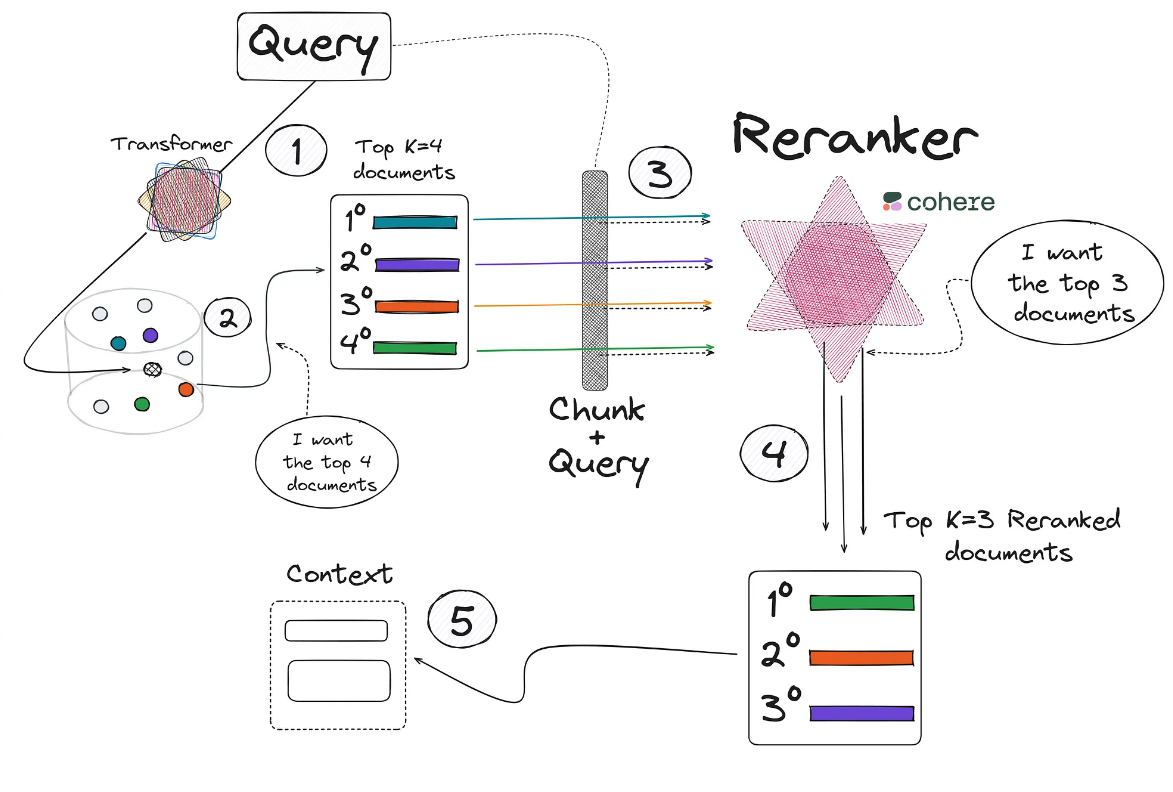
The image shows the steps:
- We obtain the query, which we encode into its vector form with a transformer and we compare it into the vector base.
- Collect the documents most similar to the query from our database. We can use any retriever method (e.g., cosine similarity).
- Next we use the cross-encoder model.
- In the example shown in the image, this model will be used a total of 4 times.
- Remember that the input of this model will be the query and a document/chunk, to collect the similarity of these two texts.
- After the 4 calls have been made to this model in the previous step, 4 new values (between 0 and 1) of the similarity between the query and each of the documents will be obtained.
- As can be seen, the chunk number 1 obtained in the Step 1 has dropped out into 4th place after reranking in Step 4.
- Then, we add the first 3 chunks most relevant to the context.
- ✦ Now, a good question would be where to find the Cross-Encoder models or how to use?
- One of the most straightforward way to use a powerful cross encoder model is to use the model made available by the company Cohere.
- While there are many open-source models that can be used for this purpose, it is beyond the scope of this training to cover them all.
- Due to the LangChain and its integration with Cohere, we only have to import the module that will execute the call to the Cohere cross-encoder model:
from langchain_cohere import CohereRerank
from langchain.retrievers.contextual_compression import ContextualCompressionRetriever
os.environ["COHERE_API_KEY"] = "YOUR API KEY FROM COHERE"
compressor = CohereRerank(top_n=3)
compression_retriever = ContextualCompressionRetriever(
base_compressor=compressor,
base_retriever=naive_retriever
)
Let’s see a comparison between a Naive Retriever (e.g., distance between embeddings) and a Reranking Retriever
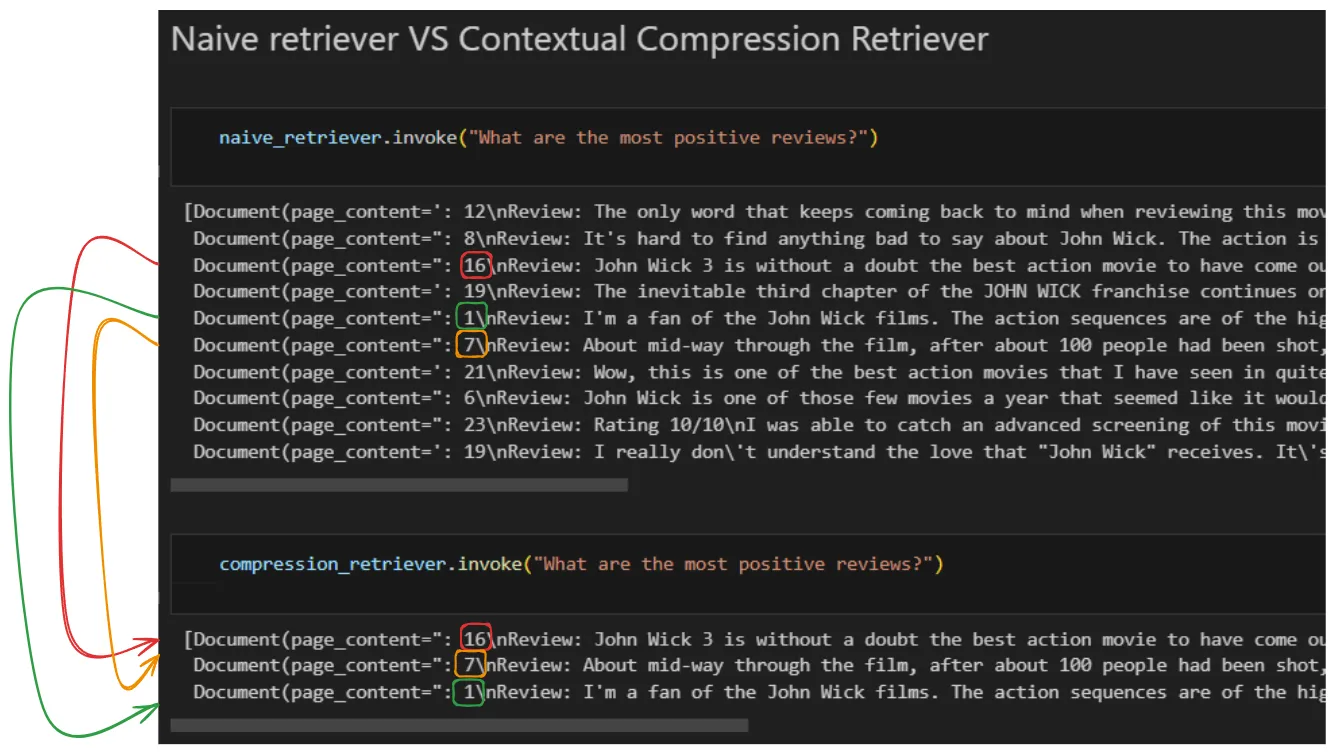
- ✦ Observations:
- As we see from the result above, Naive Retriever returns us the top 10 chunks/documents.
- After performing the reranking and obtaining the 3 most relevant documents/chunks, there are noticeable changes.
- Notice how document number 16, which is in third position in relation to its relevance in the first retriever, becomes first position when performing the reranking.
3 Context Compression (Compressing the Retrieved Documents)
- ✦ This method focus on improving the quality of retrieved docs.
- Information most relevant to a query may be buried in a document with a lot of irrelevant text.
- Passing that full document through your application can lead to more expensive LLM calls and poorer responses.
- ✦ Contextual compression is meant to fix this.
- The idea is simple: instead of immediately returning retrieved documents as-is, you can compress them using the context of the given query, so that only the relevant information is returned. “Compressing” here refers to both compressing the contents of an individual document and filtering out documents wholesale.
- For this, we can use
ContextualCompressionRetrieverfromLangChainlibrary to improve the quality of retrieved documents by compressing them.
from langchain.retrievers import ContextualCompressionRetriever
from langchain.retrievers.document_compressors import LLMChainExtractor
from langchain_openai import OpenAI
llm = OpenAI(temperature=0)
compressor = LLMChainExtractor.from_llm(llm)
compression_retriever = ContextualCompressionRetriever(
base_compressor=compressor, base_retriever=retriever
)
compressed_docs = compression_retriever.invoke(
"Why do LLMs hallucinate?"
)
pretty_print_docs(compressed_docs)
LangChain Documentation: Contextual compression | 🦜️🔗 LangChain
4 Prompt (& Context) Compression
- ✦ Prompt Compression is a method of compressing or shrinking BOTH the retrieved context or final prompt by removing irrelevant information.
- Its aim is to reduce length of the input prompt to reduce cost, improve latency and efficiency of output generation by allowing the LLM to focus on a more concise context.
- The core idea is to use LLM to generate compressed version of input prompt.
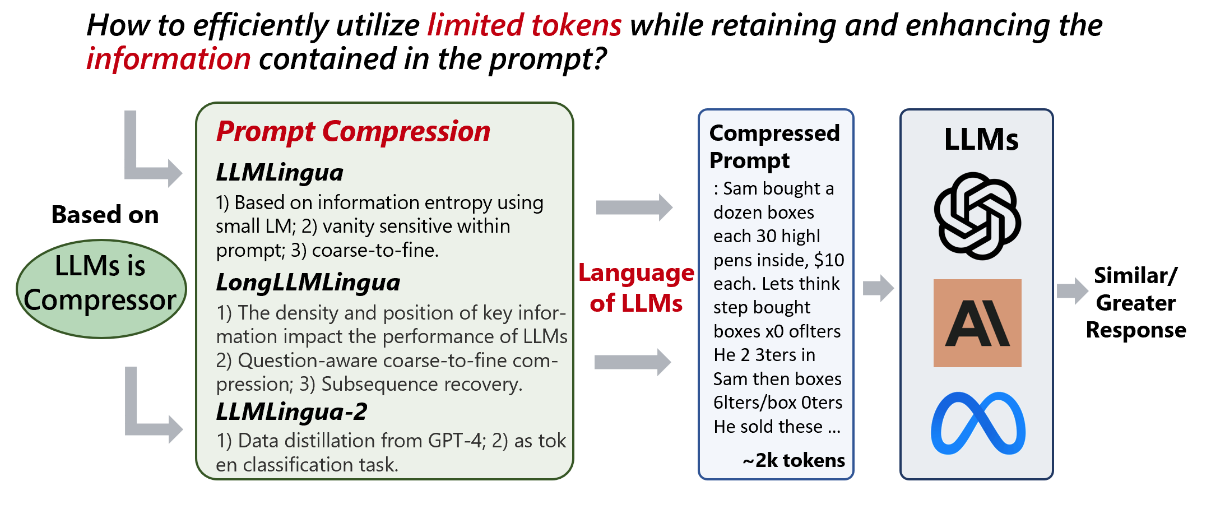
- ✦ Based on information on the repository, it was claimed that these tools offer an efficient solution to compress prompts by up to 20x, enhancing the utility of LLMs.
- 💰 Cost Savings: Reduces both prompt and generation lengths with minimal overhead.
- 📝 Extended Context Support: Enhances support for longer contexts, mitigates the "lost in the middle" issue, and boosts overall performance.
- ⚖️ Robustness: No additional training needed for LLMs.
- 🕵️ Knowledge Retention: Maintains original prompt information like ICL and reasoning.
- 📜 KV-Cache Compression: Accelerates inference process.
- 🪃 Comprehensive Recovery: GPT-4 can recover all key information from compressed prompts.
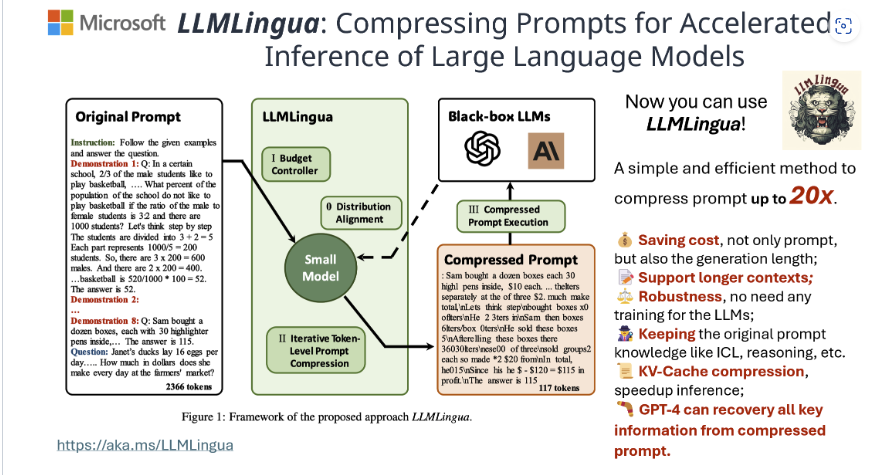
- ✦ Here is a snippet of code to show how to use the package.
# Install the package
!pip install llmlingua
from llmlingua import PromptCompressor
llm_lingua = PromptCompressor()
compressed_prompt = llm_lingua.compress_prompt(prompt, instruction="", question="", target_token=200)
This note is not intended to exhaustively cover all techniques or methods available for improving Retrieval-Augmented Generation (RAG) processes.
- RAG is a field under active research and progresses rapidly.
- Readers are encouraged to stay informed about other techniques and methods in the field to gain a comprehensive understanding of the advancements and innovations that continue to emerge.
5 Reference & Further Readings
Topic 5 - Advanced RAG
number headings: first-level 1, max 6, 1.1
icon: LiNotebookTitle: Overview - Plan of Attack
- Deep Dive into RAG
- Improving Pre-Retrieval Processe
- Improving Retrieval Processed
- Improving Post-Retrieval Processed
- RAG Evaluation
- Further Reading: WOG RAG Playbook

Table of Contents
1 Overview
- ✦ Retrieval Augmented Generation (RAG) is emerging as a crucial framework for industries and GenAI practitioners or enthusiasts to develop applications powered by Large Language Models (LLMs).
- It offers significant potential to utilize LLMs in an optimal and efficient manner for creating comprehensive GenAI applications, including chatbots, search engines, and more, which we have seen in the previous topic.
- RAG enables the dynamic integration of external knowledge sources, enhancing the accuracy and relevance of responses generated by these applications.
1.1 Why RAG
- ✦ Pre-trained foundational Large Language Models (LLMs) are developed using general-purpose data, enabling them to produce accurate and relevant responses to broad queries.
- However, when it comes to domain-specific, external, and the most current data, these models may fall short.
- In such instances, LLMs might generate incorrect or misleading information due to their reliance on outdated or irrelevant data sources.
- To address these challenges, Retrieval Augmented Generation (RAG) techniques have been explored.
1.2 Quick Recaps on the Basics of RAG
- ✦ Retrieval Augmented Generation (RAG) is a framework that enhances the capabilities of LLMs by providing them with additional, relevant contextual information alongside the original query in the form of a prompt.
- RAG involves searching across a vast corpus of private data and retrieving results that are most similar to the query asked by the end user so that it can be passed on to the LLM as context.
- This approach enables the LLM to better understand the user's query and its context, leading to more accurate and pertinent responses.
- The process is akin to an open-book exam, where the model first retrieves relevant contextual data before generating an answer based on this information.
- ✦ There are 5 main steps in RAG:
- Document Loading
- In this initial step, relevant documents are ingested and prepared for further processing. This process typically occurs offline.
- Splitting & Chunking
- The text from the documents is split into smaller chunks or segments.
- These chunks serve as the building blocks for subsequent stages.
- Storage
- The embeddings (vector representations) of these chunks are created and stored in a vector store.
- These embeddings capture the semantic meaning of the text.
- Retrieval
- When an online query arrives, the system retrieves relevant chunks from the vector store based on the query.
- This retrieval step ensures that the system identifies the most pertinent information.
- Generate Output
- Finally, the retrieved chunks are used to generate a coherent response.
- This output can be in the form of natural language text, summaries, or other relevant content.
- Document Loading
2 Problems with Naive RAG or Vanilla RAG

The basic or "Vanilla" RAG, also known as Naive RAG, exhibits several limitations, particularly when applied to complex use cases or in the development of production-ready applications.
As we saw in the previous topic, building an RAG prototype is relatively easy – investing around 20% of the effort yields an application with 80% performance. However, achieving a further 20% performance improvement requires the remaining 80% of the effort.
Below are some key reasons why Naive RAG may not always deliver the most effective and optimized outcomes.
2.1 Contextual Limitations
- ✦ One of the primary issues with Naive RAG is its handling of context.
- ✦ In this framework, a single chunk retrieved from a vector store is expected to provide the necessary context for the LLM to generate a response.
- ✦ However, these chunks, being mere subunits of a larger document, often contain incomplete context.
- ✦ This partial context can result in responses that lack crucial information or, conversely, include irrelevant details, thereby diminishing the overall relevance and accuracy of the output.
2.2 Relevance vs. Similarity
- ✦ Another significant challenge is the distinction between relevance and similarity.
- ✦ Naive RAG operates on the principle that a high similarity score between a query and a retrieved chunk indicates a high degree of relevance.
- ✦ Unfortunately, this is not always the case.
- ✦ A chunk may share many keywords or concepts with the query and still fail to address the user's actual intent, leading to responses that, while technically similar, are practically unhelpful.
2.3 Query Complexity
- ✦ The effectiveness of Naive RAG is also compromised by the complexity and structure of user queries.
- ✦ Queries that are poorly phrased, overly complex, or contain multiple questions pose a particular challenge.
- ✦ In such instances, the LLM may struggle to generate accurate responses on the first attempt, if at all.
- ✦ The limitation of retrieving a single chunk exacerbates this issue, as it is unlikely to provide sufficient context for all aspects of a multifaceted query.
2.4 Impact of Chunk Ordering
- ✦ The order in which chunks are presented to the LLM for response generation plays a critical role in the quality of the output.
- ✦ Naive RAG does not adequately address the significance of chunk ordering, often leading to suboptimal response generation.
- ✦ The lack of a sophisticated mechanism for determining the most effective sequence of chunks can result in responses that are disjointed or fail to build coherently on the provided context.
To overcome these limitations of naive RAG, there are two aspects that are essential:
-
- some improvements can be done on top of naive RAG architecture
-
- evaluation of RAG pipeline to understand how the modifications affect the performance
3 Improvements over Naive RAG
RAG is only as good as the retrieved documents’ relevance and quality. Fortunately, an emerging set of techniques can be employed to design and improve RAG systems.
The improvement of RAG is not just a matter of incremental updates, by installing newer Python package or calling any functions out-of-the-box, but many of them involves a comprehensive rethinking of its architecture and processes.
We can group the various improvements under 3 major categories:
- ✦ Pre-Retrieval Processes
- ✦ Retrieval Process
- ✦ Post-Retrieval Process
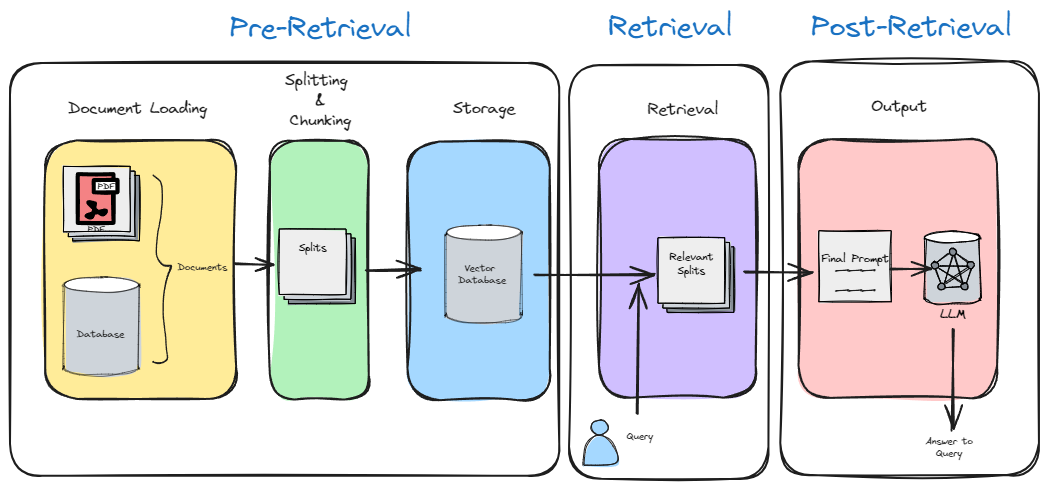
- 2. Improving Pre-Retrieval Processes
- 3. Improving Retrieval Processes
- 4. Improving Post-Retrieval Processes
You might also be interested in the GovTech playbook included in 6. Further Readings - WOG RAG Playbook, where the results of different techniques have been experimented on two specific use cases. This playbook can serve as a general reference point for starting your own experiments, particularly for techniques that have shown the greatest improvement in accuracy and the ability of the RAG pipeline.
4 Evaluation of RAG

-
Evaluation of RAG systems is essential to benchmark the overall performance of RAG output.
-
To evaluate RAG we can use metrics like:
- answer relevancy,
- faithfulness for generation and context recall,
- precision for retrieval.
-
These metrics provide a structured way to assess the quality of the generated answers and the relevance of the information retrieved by the system.
- However, the complexity and variability of RAG systems necessitate a more comprehensive and nuanced approach to evaluation.
-
Enter RAGAS, a framework specifically designed for this purpose.
- RAGAS offers a suite of tools and metrics tailored to evaluate RAG-based applications at a component level, providing a clear pathway for developers or enthusiasts to assess and enhance their applications systematically, allowing developers to fine-tune their systems with more confidence.
We will go into the details of RAG evaluation in 5. RAG Evaluation
5 [Extra] Reference & Further Readings
icon: LiWrenchTitle: Improving Pre-Retrieval Processes
- Deep Dive into RAG
- Improving Pre-Retrieval Processe
- Improving Retrieval Processed
- Improving Post-Retrieval Processed
- RAG Evaluation
- Further Reading: WOG RAG Playbook
1 Overview
- ✦ As name suggest this contains optimizations which are done before retrieval process to enhance quality retrieval of context.
- ✦ It includes:
- Better Splitting & Chunking of Document,
- query transformation*,
- query routing*.
*While the diagram shows the query in "retrieval" phrase, we will be discussing the improving RAG with query in the
Pre-Retrieval Processes because the "construction" or "enhancement" of the query are somethings that happen before the retrieval process.2 Better Splitting & Chunking of Document

-
✦ As we have already seen in Naive RAG that chunks are nothing but the small parts of whole document and indexing is vector representation of these chunks which we store in Vector DB.
- How we do splitting and chunking, and eventually embedding makes an impact on accurate retrieval which then improves generation quality and contextual confidence.
- The simplest way for splitting and chunking is fixed size chunking like simple character splitter or word splitter but it is not as effective as it may not hold full context of specific subject which also known as context fragmentation.
-
✦ We quote a paragraph from GovTech RAG Playbook that perfectly sums up the challenges of finding the right balance between the chunk size and the accuracy of the RAG pipeline. We included the RAG Playbook under the "Further Readings" for Topic 5.
Chunk and Overlap SizeWhile it is possible to obtain an embedding for a document as long as it fits into the embedding model’s context length, embedding an entire document is not always an optimal strategy. It is common to segment documents into chunks and to specify an overlap size between chunks.
Both of these parameters can help to facilitate the flow of context from one chunk to another, and the optimal chunk and overlap size to use is corpus specific. Embedding a single sentence focuses on its specific meaning but forgoes the broader context in the surrounding text. Embedding an entire body of text focuses on the overall meaning but may dilute the significance of individual sentences or phrases.
Generally, longer and more complex queries benefit from smaller chunk sizes while shorter and simpler queries may not require chunking.
Source: GovTech RAG Playbook
-
✦ While fixed-size chunking offers a straightforward approach, it often leads to context fragmentation, hindering the retrieval of accurate information.
- To expand the number of options you can consider when building your RAG pipeline, this note introduces more sophisticated chunking techniques.
2.1 Recursive Split For Specific File Types
-
✦ Also known as recursive structure aware chunking, content based chunking which can keep the context and format of text or the specific file types, such as HTML, PDF, Markdown, JSON.
-
✦ Simply put, using the right or suitable document splitter method for the use case will help us to derive chunks that are tailored to the specific file formats that we are dealing with.
- This choice significantly impacts the quality and relevance of derived text chunks, offering benefits such as format-specific processing, preservation of structural elements, enhanced context retention, and improved accuracy in downstream tasks.
- For example, when dealing with HTML files, specialized loaders can retain important elements like headings (
<h1>), paragraphs (<p>), and tables (<table>), enabling custom processing based on element types. - However, it's not a magical solution; simply applying the technique is not enough. In many cases, developers need to write custom functions to effectively process the retained structural elements and extract meaningful information. This additional step ensures that the preserved document structure is fully utilized to meet specific analytical requirements and maximize the value of the chunking process.
- It is still a good start with a suitable splitter method(s), rather than the overly simple splitter, like
CharacterTextSplitter.
-
✦
Langchainsupports many of the commonly used file types. Refer to the table below:- The table below shows the different
text splittersoffered by Langchain.- Name: Name of the text splitter
- Splits On: How this text splitter splits text
- Description: Description of the splitter, including recommendation on when to use it.
- The table below shows the different
| Name | Splits On | Description |
|---|---|---|
| Recursive | A list of user defined characters | Recursively splits text. Splitting text recursively serves the purpose of trying to keep related pieces of text next to each other. This is the recommended way to start splitting text. |
| HTML | HTML specific characters | Splits text based on HTML-specific characters. Notably, this adds in relevant information about where that chunk came from (based on the HTML) |
| Markdown | Markdown specific characters | Splits text based on Markdown-specific characters. Notably, this adds in relevant information about where that chunk came from (based on the Markdown) |
| Code | Code (Python, JS) specific characters | Splits text based on characters specific to coding languages. 15 different languages are available to choose from. |
Chunkviz utility. - Chunkviz is a great tool for visualizing how your text splitter is working.
- It will show us how our text is being split up and help in tuning up the splitting parameters.
- 👆🏻 Access the tool from https://chunkviz.up.railway.app/)
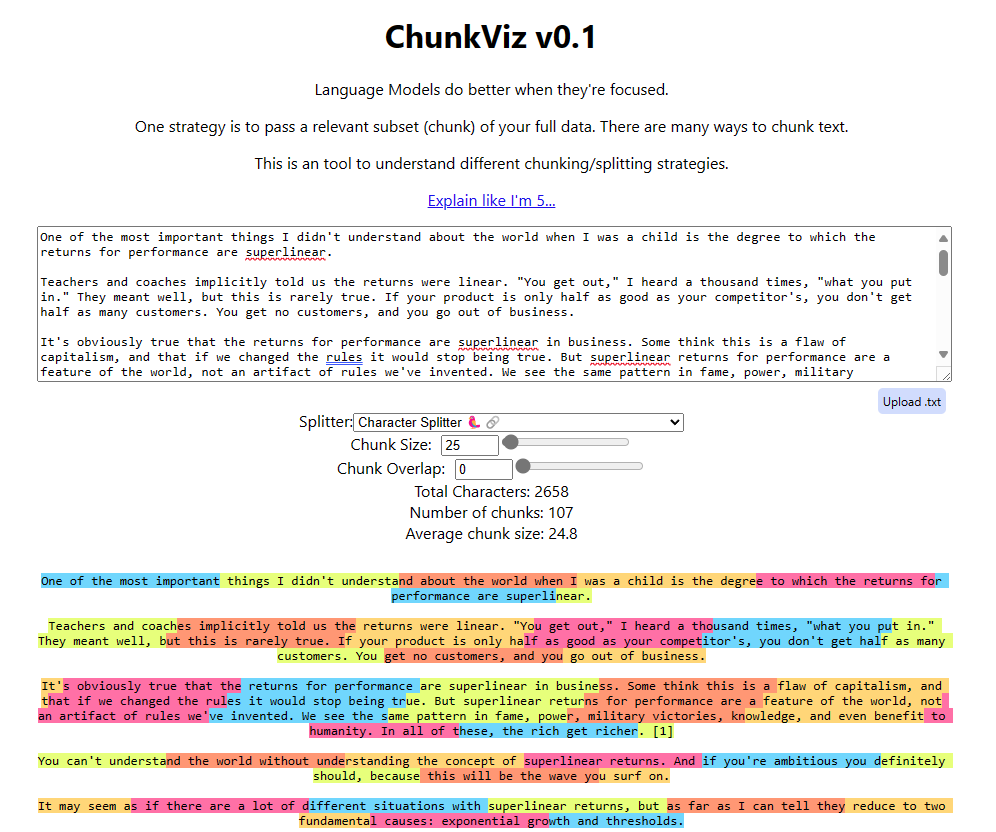
2.2 Semantic Chunking
-
✦ Semantic chunking is one the more sophisticated chunking methods.
- Semantic chunking relies heavily on embeddings, powerful tools for understanding text semantics.
- Here’s how semantic chunking works in practice:
- Text segments with similar meanings are grouped together.
- Leveraging embeddings, we analyze and group consecutive sentences within a specified window size.
- Beginning with the initial sentence, we compare its embedding to the subsequent sentences, iterating through the text until a significant deviation is detected, indicating a potential break point.
- Continuously computing embeddings within each sentence set allows for dynamic adjustments, refining the grouping process and enhancing our understanding of the text’s meaning.
- Through this method, we identify coherent groups of sentences that form meaningful sections, aiding in analysis and comprehension.
-
✦ The easiest way to take advantage of this cutting-edge chunking approach is to use Langchain's experimental module:
!pip install --quiet langchain_experimental langchain_openai
# Load Example Data
# This is a long document we can split up.
with open("../../state_of_the_union.txt") as f:
state_of_the_union = f.read()
# Create Text Splitter
from langchain_experimental.text_splitter import SemanticChunker
from langchain_openai.embeddings import OpenAIEmbeddings
# That's it. It is this simple.
text_splitter = SemanticChunker(OpenAIEmbeddings())
# Spit Text
docs = text_splitter.create_documents([state_of_the_union])
print(docs[0].page_content)
3 Query Transformation

-
✦ Query transformation is a method of improving quality of user query by restructuring it to improve retrieval quality.
-
✦ It includes techniques like:
- Query rewriting
- Decomposing main query into multiple sub queries
3.1 Query Rewriting
- ✦ In the real world, a user's query may not be properly phrased or optimized to get quality retrieval. This will affect the end output.
- To overcome this issue, we can rewrite or rephrase the query so that it can optimally retrieve relevant context.
- To help us to better understand the intuition behind query rewriting, see the code example below. We may modify the code to suit our use case (it doesn't have to be web search engine).
- What we have to do is to use the "improved" query, instead of the original query for the RAG.
# The main part is a rewriter to rewrite the query
prompt = """Provide a better search query for \
web search engine to answer the given question.
Question: {user_query}
"""
- ✦ You can refer to the notebook here for the complete implementation of this technique langchain/cookbook/rewrite.ipynb at master · langchain-ai/langchain (github.com)
3.2 Multi Query Retrieval / Sub Query Decomposition
-
✦ If the query is complex and has multiple context then, retrieval with a single query may not be the good approach as it may fail to get the proper output you want.
- In sub query decomposition,
- First, the user query is decomposed into multiple sub queries using LLM,
- Then, retrievals using this sub queries are done in parallel and after that, these retrieved contexts are combined together as a single prompt for the final answer generation.
- In sub query decomposition,
-
✦ In LangChain, we can use MultiQueryRetriever for implementation of this technique. The
MultiQueryRetrieverautomates the process of prompt tuning by using an LLM to generate multiple queries from different perspectives for a given user input query.- For each query, it retrieves a set of relevant documents and takes the unique union across all queries to get a larger set of potentially relevant documents.
- By generating multiple perspectives on the same question, the
MultiQueryRetrievermight be able to overcome some of the limitations of the distance-based retrieval and get a richer set of results. - Below is a sample implementation using
MultiQueryRetriever
from langchain_chroma import Chroma
from langchain_community.document_loaders import WebBaseLoader
from langchain_openai import OpenAIEmbeddings
from langchain_text_splitters import RecursiveCharacterTextSplitter
# Load blog post
loader = WebBaseLoader("https://lilianweng.github.io/posts/2023-06-23-agent/")
data = loader.load()
# Split
text_splitter = RecursiveCharacterTextSplitter(chunk_size=500, chunk_overlap=0)
splits = text_splitter.split_documents(data)
# VectorDB
embedding = OpenAIEmbeddings()
vectordb = Chroma.from_documents(documents=splits, embedding=embedding)
# This is the Core Part of the Code
from langchain.retrievers.multi_query import MultiQueryRetriever
from langchain_openai import ChatOpenAI
question = "What are the approaches to Task Decomposition?"
llm = ChatOpenAI(temperature=0)
retriever_from_llm = MultiQueryRetriever.from_llm(
retriever=vectordb.as_retriever(), llm=llm
)
- ✦ To understand the intuition behind this method, we can think of it as when an original query is received, it is passed to an LLM to generate 5 different related queries. Then each of these queries is used to retrieve the relevant documents. Here is the prompt being used by LangChain:
template="""You are an AI language model assistant. Your task is to generate five
different versions of the given user question to retrieve relevant documents from a vector
database. By generating multiple perspectives on the user question, your goal is to help
the user overcome some of the limitations of the distance-based similarity search.
Provide these alternative questions separated by newlines.
Original question: {question}"""
4 [Extra] Query Routing

-
✦ When we are having multiple vector stores / databases or various actions to perform on user query based on its context, then routing the user query in the right direction is very important for relevant retrieval and further generation.
-
✦ Using specific prompt and output parsers, we can use an LLM call to decide which action to perform or where to route the user query.
- In fact, we have implemented this when we identified the types of the customer query and then directed the query to the correct departments in our Topic 3 notebook Notebook for Reference - Part 2
-
✦ If you're keen to use any frameworks, you can use prompt chaining or custom Agents to implement query routing in LangChain or LlamaIndex.
- Don't worry if you don't understand what is "Agents" at this stage. We may come to that later in this training.
This note is not intended to exhaustively cover all techniques or methods available for improving Retrieval-Augmented Generation (RAG) processes.
- RAG is a field under active research and progresses rapidly.
- Readers are encouraged to stay informed about other techniques and methods in the field to gain a comprehensive understanding of the advancements and innovations that continue to emerge.
icon: LiWrenchTitle: Create Multi-Agent Systems with CrewAI
- Towards AI Agents
- More Secure way to Store Credentials
- Writing & Running Python Scripts
- Hands-on Walkthrough and Tasks
- Create Multi-Agent Systems with CrewAI

1 Intro CrewAI
CrewAI is an open-source framework designed to orchestrate and coordinate teams of autonomous AI agents, similar to Autogen. Think of it as a way to assemble and manage a group of AI assistants that collaborate to achieve a shared objective, much like a crew on a ship or a project team.
Here are some essential aspects of CrewAI:
- ✦ Emphasis on Collaboration: Unlike many AI frameworks that prioritize individual agents, CrewAI is built for seamless teamwork. Agents share information and tasks, leveraging “collaborative intelligence” to tackle complex challenges that would be daunting for a single agent to handle.
- ✦ Role-Specific Agents: Each agent within a CrewAI team can assume a distinct role—be it a data engineer, marketer, or customer service representative. This role-based approach allows you to customize the team according to the specific demands of your project.
- ✦ User-Friendly and Adaptable: CrewAI is designed with simplicity in mind, making it accessible even for those without a deep understanding of AI. Its flexibility means you can easily tailor it to meet your unique requirements, including the ability for each agent to utilize different large language models (LLMs) suited to their specific roles and tasks.
2 Common Use Cases for CrewAI
1. Building a Smart Assistant Platform: CrewAI can be leveraged to develop a team of agents capable of managing various tasks, such as scheduling appointments, arranging travel, and responding to user inquiries. This creates a comprehensive smart assistant that streamlines everyday activities.
2. Creating an Automated Customer Service System: With CrewAI, you can assemble a team of agents dedicated to handling customer inquiries, resolving issues, and providing support. This automated system enhances customer experience by ensuring timely and efficient responses.
3. Developing a Multi-Agent Research Team: CrewAI can facilitate the formation of a collaborative research team composed of agents that work together on projects. They can analyze data, generate hypotheses, and test ideas, making the research process more efficient and effective.
3 The CrewAI Workflow Process
The CrewAI workflow process typically involves the following steps:
1. Agents: In this initial phase, you define the capabilities of your CrewAI workflow by specifying the agents involved. This includes outlining their roles and the skills they should possess, effectively determining who does what within the team.
2. Tasks: Next, you establish the specific objectives you want your agents to achieve. This step is crucial for guiding the agents toward accomplishing the desired outcomes.
3. Process: Here, you outline how CrewAI will utilize the defined agents and tasks to meet the overarching goals of your project. This involves mapping out the interactions and workflows that will drive the collaboration.
4. Run: Finally, you initiate the execution of your agents and tasks. Once the run is underway, assuming everything goes smoothly, CrewAI will generate results aimed at solving the stated objectives. This step marks the transition from planning to action, bringing your workflow to life.
4 Key Elements of CrewAI Agent
-
✦ Focus
- When mixing too much information, too many tools, or too much context, the models can lose important information (and also open up opportunities for more hallucination)
- Another great advantage of the agent is they are able to focus:
- Tools available
- Context
- Goal to achieve
-
✦ Tools
- Can overload agents with too many tools
- Smaller models may not know which is the context, which are the tools
- Provide the agents with the key tools to do the job that they need.
-
✦ Memory
- Make huge and immense differences for the agents
- Recollect what they did in the past, learn from it, and apply their knowledge into future execution
- Some frameworks offer different types of memory and different types of implementations for it.
- CrewAI Agents have three types of memory:
- I) Long-term memory
- Memory that is remain even after the crew finishes
- The memory is stored in a database locally
- Everything after an agent completed the tasks, it self critiques itself to learn what it should have done better; or what are the things that should be in there that are not
- Leads to self-improving agents
- II) Short-term memory
- Use only during the crew execution
- When crew kick-off, it starts from the bank
- Agents store different things that they learn in this memory
- Allow agents to share knowledge, activities, and learnings with other agents. Agent 1 can tap into learnings from Agent 3.
- Allows agents to share intermediate information even before providing “task completion” output.
- III) Entity memory
- Only being store during the execution
- It stores what are the subjects that are being discussed

- I) Long-term memory
5 Equip Agents with Tools
A tool in CrewAI is a skill or function that agents can utilize to perform various actions.
Tools are pivotal in extending the capabilities of CrewAI agents, enabling them to undertake a broad spectrum of tasks and collaborate effectively. When building solutions with CrewAI, leverage both custom and existing tools to empower your agents and enhance the AI ecosystem
- ✦ Tools are essential for LLM Agents as they significantly enhance their capabilities.
- ✦ They enable agents to perform a wide range of tasks, from web searching and data analysis to content generation and collaboration.
- ✦ Tools also provide customizability, allowing developers to create or integrate specific functionalities tailored to their needs.
- ✦ Agent Level:
- The Agent can use the Tool(s) on any Task it performs.
- ✦ Task Level:
- The Agent will only use the Tool(s) when performing that specific Task.
5.1 Key Differences Between Assigning Tools to an Agent vs. a Task
Here are the primary distinctions:
-
Purpose of Tools for Agents vs. Tasks
- Agents: Tools given to agents are meant to empower the agent throughout its operational lifespan. They are part of the agent’s capabilities and are accessible during any task execution. These tools reflect the agent’s skill set, enhancing the agent’s overall functionality and efficiency.
- Tasks: Tools assigned to tasks are utilized specifically within the context of that task. The tools here are employed to achieve a specific goal tied to the task, regardless of the agent performing it. The task defines which tools are necessary to complete its assignment and can override the default tools of an agent.
-
Scope and Context of Tool Usage
- Agents: The tools assigned to agents are available across all tasks the agent undertakes. For example, if an agent has a web scraping tool, it can use this tool for any task it is assigned to as long as the task requires or permits it.
- Tasks: Tools assigned to a task are only usable within the context of that specific task. This setup allows for a high degree of control, ensuring the task uses the most appropriate tools. It also enables different agents to use the same task without necessarily needing to have those tools themselves.
-
Control Over Execution
- Agents: When an agent has tools, it controls when and how those tools are used. This setup is suitable when you want an agent to be autonomous and make decisions on when to leverage its abilities. It’s ideal for agents with expertise or unique skills that require specific tools frequently.
- Tasks: Assigning tools to tasks grants control over tool usage to the task definition itself. This method is beneficial when a task requires specific actions, such as querying a database or making an API call, that need precise tool usage. This setup allows different agents to perform the task while adhering to the tool requirements set by the task.
-
Tool Management and Overlap
- Agents: If multiple agents have the same tool, each will manage its instance of that tool, potentially leading to redundant tool usage if not carefully planned. This situation requires mindful management to avoid inefficiencies.
- Tasks: When tools are task-specific, the tools are only instantiated when the task is executed. This can lead to more streamlined usage and fewer conflicts, as tools are utilized only in the context where they are explicitly needed.
5.2 Deterministic vs. Probabilistic Tool Usage
- ✦ Tools at the Task Level (Deterministic Usage):
- When a tool is assigned directly to a task, it is guaranteed to be used whenever that task is executed, assuming the task’s logic calls for it. This deterministic nature means that the task’s execution path explicitly involves the tool, ensuring consistent and predictable behavior every time the task runs.
- For example, if a task is designed to query a database, and it has a database connector tool assigned to it, the task will always invoke this tool as part of its execution flow. The tool’s usage is pre-defined and non-negotiable, ensuring the task’s requirements are consistently met.
- ✦ Tools at the Agent Level (Probabilistic Usage):
- Tools assigned to agents, on the other hand, operate more probabilistically. This means that even though an agent possesses a tool, it may choose to use it or not based on its internal logic, task requirements, or decision-making process during task execution.
- An agent with a data analysis tool, for example, might not always use it for every task it handles. The agent’s behavior is influenced by factors like task descriptions, agent backstory, goals, or even prior outcomes, making tool usage more dynamic and less predictable.
5.2.1 Why This Difference Matters
- Control and Predictability:
- Task-Level Tools: Provide control and predictability since you know exactly when and how the tools will be used. This is crucial for tasks where specific actions must always occur, ensuring reliable task completion.
- Agent-Level Tools: Offer flexibility and adaptive behavior, but at the cost of less control. Agents decide when a tool is necessary, allowing for more creative problem-solving but also introducing variability.
- Design Implications:
- If you need consistency in how a tool is used, place it at the task level. This approach is suitable for scenarios where specific tool operations are non-negotiable parts of the task.
- If you prefer autonomy and want the agent to decide the best approach, assign tools at the agent level. This setup is ideal for roles requiring adaptive strategies and decision-making.
5.2.2 Practical Scenario
- ✦ Deterministic Example: A data extraction task that always requires accessing a specific API would have the API connector tool assigned to it. Every time the task runs, it will use this tool, ensuring the data is retrieved consistently.
- ✦ Probabilistic Example: An agent responsible for gathering insights from web data may or may not use a web scraper tool depending on the task’s demands, previous information gathered, or the agent’s strategy at that moment.
5.3 Incorporating Third-Party Tools
CrewAI's ability to support not only its native tools but also third-party tools from LangChain and LlamaIndex offers significant advantages.
-
✦ This flexibility allows users to leverage a broader range of functionalities and integrations, enhancing the overall versatility and capability of the platform.
-
✦ Developers are not confined to the tools provided by CrewAI alone; they can seamlessly integrate and utilize the best tools available in the market, tailored to their specific needs.
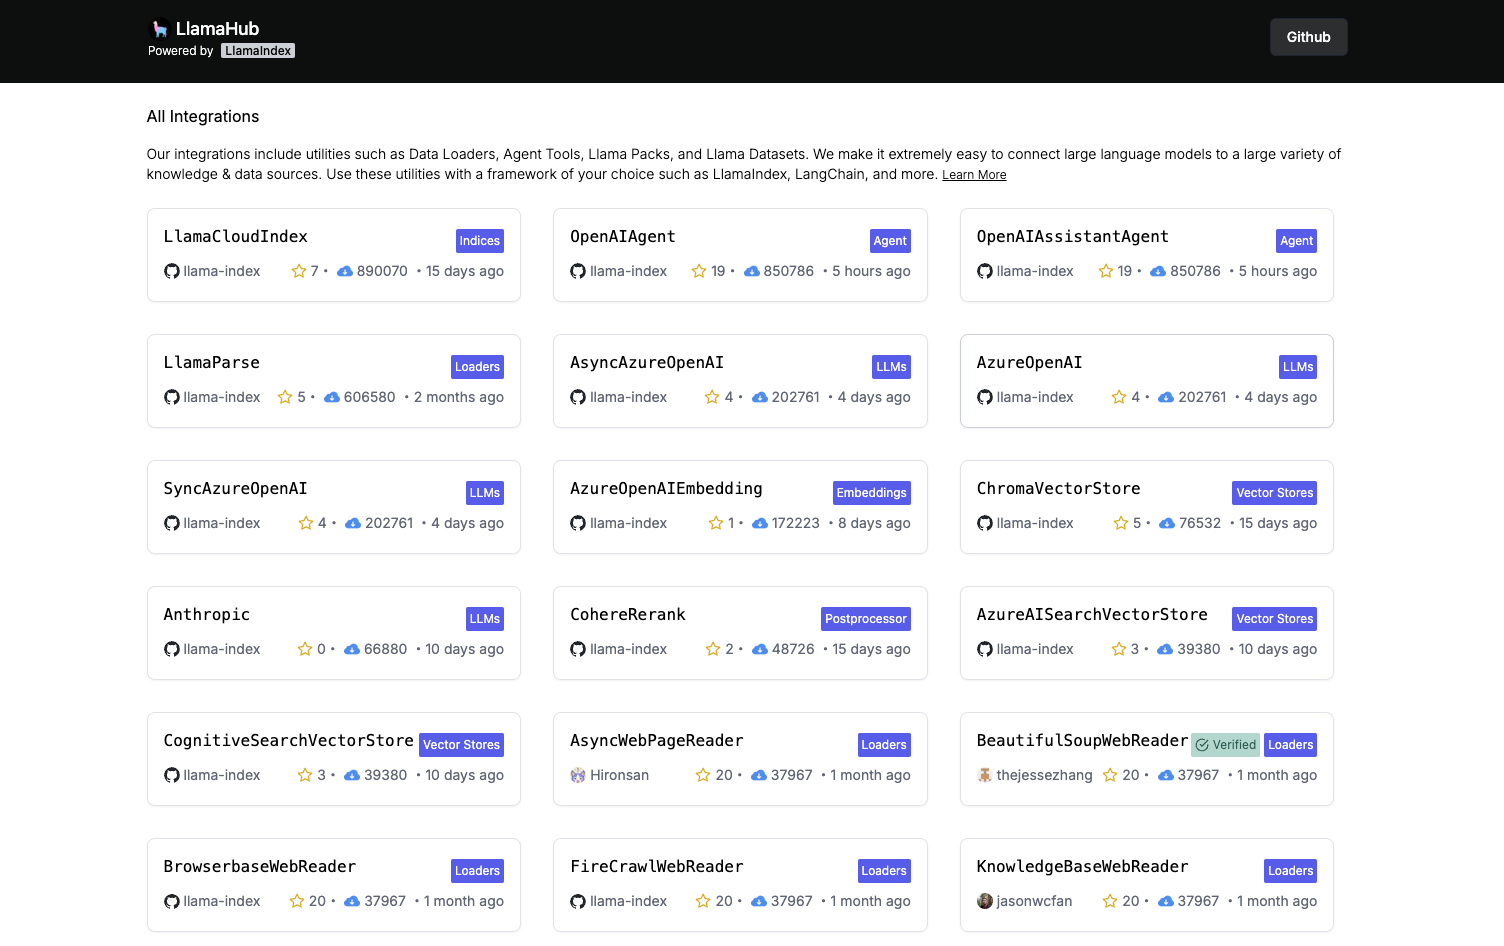 Screenshot of a collection of LlamaIndex tools (integrations)
In ourwalkthroughnotebook, we have tried a more advanced example that usestoolkits(a suit of tools) from LangChain to create a tool that can manipulate and analyze tabular data by actually running Python code. -
✦ This tool uses the
pandaslibrary to manipulate the data and theChatOpenAIagent to run the code. -
✦ While the example is a bit more complex, but we think it's worth to include it because the simplier examples (using a single
toolfrom LangChain) are already well documented in CrewAI's documentation. -
✦ The
toolkitsare usually much more powerful and can be used to achieve more complex tasks, but we have yet to come across a comprehensive documentation on how to incorporate them into CrewAI's agents.
from langchain.agents import Tool
from langchain.agents.agent_types import AgentType
from langchain_experimental.agents.agent_toolkits import create_pandas_dataframe_agent
from langchain_openai import ChatOpenAI
import pandas as pd
df = pd.read_csv("https://raw.githubusercontent.com/pandas-dev/pandas/main/doc/data/titanic.csv")
pandas_tool_agent = create_pandas_dataframe_agent(
llm=ChatOpenAI(temperature=0, model='gpt-4o-mini'),
df=df,
agent_type=AgentType.OPENAI_FUNCTIONS,
allow_dangerous_code=True # <-- This is an "acknowledgement" that this can run potentially dangerous code
)
# Create the tool
pandas_tool = Tool(
name="Manipulate and Analyze tabular data with Code",
func=pandas_tool_agent.invoke, # <-- This is the function that will be called when the tool is run. Note that there is no `()` at the end
description="Useful for search-based queries",
)
- ✦
LangChaintools in CrewAI, see https://docs.crewai.com/core-concepts/Using-LangChain-Tools/ - ✦
LlamaIndextools in CrewAI, see https://docs.crewai.com/core-concepts/Using-LlamaIndex-Tools
for more info about
Tools, such as the list of tools or how to create your own tool, see https://docs.crewai.com/core-concepts/Tools/#introduction
icon: LiNotebookTowards AI Agents
- Towards AI Agents
- More Secure way to Store Credentials
- Writing & Running Python Scripts
- Hands-on Walkthrough and Tasks
- Create Multi-Agent Systems with CrewAI

1 Overview
1.1 Limitations of LLMs
Many users of ChatGPT quickly realize that the default workflow for large language models (LLMs) has its limitations, especially as task complexity increases. Even when employing optimal prompt engineering strategies, prompts can become excessively lengthy, leading to a higher likelihood that the LLM will misinterpret or overlook critical instructions.
-
✦ A common workaround is to iteratively refine the chatbot's responses through additional prompting; however, this method can be labor-intensive and may cause the LLM to become trapped by previous inaccuracies within the chat context.
-
✦ Moreover, real-world applications often necessitate the integration of various tools, such as internet searches, access to relevant internal documents through Retrieval Augmented Generation (RAG), mathematical computations, coding capabilities, and safety measures to protect sensitive data.
1.2 The Rise of Multi-Agent Systems
The shift towards agents is about creating AI systems that can truly understand, learn, and solve problems in the real world.
While LLMs and RAG models have pushed the boundaries of what’s possible with language generation, the development of AI agents represents a step towards more intelligent, autonomous, and multi-capable systems that can work alongside humans in a wider variety of scenarios.
Multi-agent system also often known as agentic system.
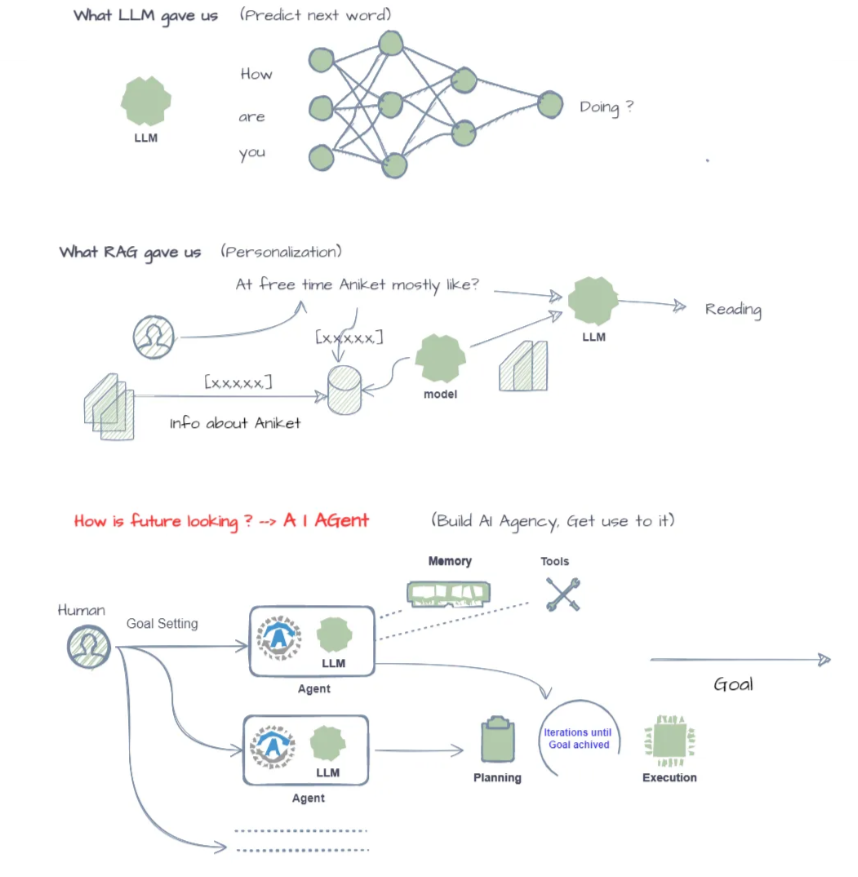
Figure below gives a good illustration into the differences between a typical LLM workflow and agentic workflow.
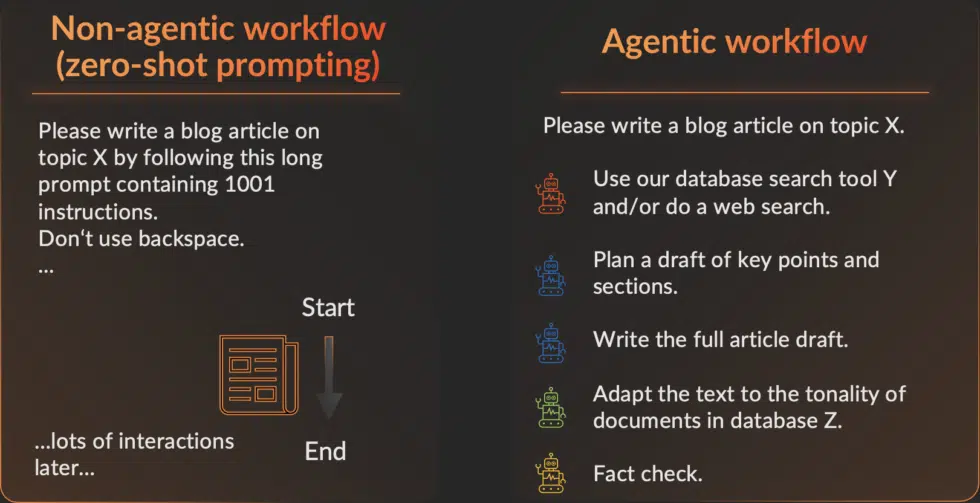
Many believe that the AI Agents is going to be the future of AI.
What I'm seeing with AI agents which I think is the exciting Trend that I think everyone building an AI should pay attention.
Andrew Ng (Creator of Google Brain)
AI field is headed towards self contained autonomous agents & it won't be single agent, it will be many agents working together
Andrej Karpathy (co-founder of Open AI)
Developer becomes the user and so we're evolving toward any user being able to create its own autonomous agent. I'm pretty sure that in 5 years from now this will be like something that you learn to do at school
Arthur Mensch (CEO Mistral AI)
1.3 Why do we need AI Agent, when we have LLM & RAG?
“So this is just GPT-4 with RAG?” or “Isn’t this the same as chaining together a couple of prompts?”
There are several key reasons why AI Agents perform better than one LLM:
-
✦ Goal-oriented behavior:
- LLMs and RAG models are primarily focused on generating human-like text based on patterns in their training data.
- However, they lack the ability to set and pursue specific goals in a flexible, intelligent manner.
- AI agents, on the other hand, can be designed to have explicit goals and to plan and take actions to achieve those goals.
-
✦ Interaction with the environment:
- LLMs operate solely in the text domain, without any direct interaction with the physical world.
- AI agents can perceive and act upon their environment, whether that is the digital world, robotic systems, or even the physical world through sensors and actuators.
-
✦ Memory and state tracking:
- Most current language models have no persistent memory or state tracking capabilities. Each input is processed independently.
- AI agents can maintain an internal state, accumulating knowledge over time and using that state to inform future decisions and actions.
-
✦ Multi-task capability:
- LLMs are typically specialized for particular language tasks.
- AI agents can be designed as general, multi-task systems capable of fluidly combining various skills like language, reasoning, perception, and control to tackle complex, multi-faceted problems.
-
✦ Improved Accuracy
- Last but a strong reason is that using multiple agents can greatly improve the performance of the LLMs.
- In one of his lecture, Andrew Ng highlighted that an agentic workflow utilizing "simpler" models, such as GPT-3.5, can significantly outperform zero-shot prompting with more advanced models like GPT-4.
- "GPT-3.5 (zero shot) was 48.1% correct. GPT-4 (zero shot) does better at 67.0%. However, the improvement from GPT-3.5 to GPT-4 is dwarfed by incorporating an iterative agent workflow. Indeed, wrapped in an agent loop, GPT-3.5 achieves up to 95.1%. "
- Improved accuracy arises from iterations that give agents an opportunity to “fact-check” and “review” their answers which leads to less hallucinations.
1.4 Understand the differences between LLM, RAG & AI Agent
Imagine you need to book a complex trip:
-
✦ LLM: Could explain different places to visit or give general travel tips.
-
✦ RAG: Could find relevant blogs and articles about destinations
-
✦ AI Agent: Could do all that, PLUS:
- Search for flights and hotels based on your budget
- Actually make the bookings
- Add everything to your calendar
- Send pre-departure reminders with relevant information
Now let's see what are the key differences based on this simple example:
1. Task Orientation vs. General Knowledge
- ✦ LLMs:
- Excel at broad language understanding and generation.
- They’re like massive libraries of information.
- ✦ RAG:
- Improves LLMs by finding relevant information. Still, the focus is on knowledge and text generation.
- ✦ AI Agents:
- Are built with specific goals in mind. They bridge the gap between understanding language and taking action in the real world or within digital systems.
2. Multi-Step Reasoning
- ✦ LLMs & RAG:
- Primarily work on single inputs and provide responses based on that.
- ✦ AI Agents:
- Can chain together multiple steps:
- Retrieve information (like RAG)
- Process the information to make decisions
- Take actions like:
- Sending an email
- Booking an appointment
- Controlling smart home devices
- Can chain together multiple steps:
3. Proactivity
- ✦ LLMs & RAG: Usually respond to direct prompts.
- ✦ AI Agents:
- Can be proactive. They can:
- Monitor data streams and alert you to critical changes
- Initiate actions based on your preferences
- Adapt their behavior over time as they learn about you
- Can be proactive. They can:
4. Integration with Existing Systems
- ✦ LLMs & RAG:
- Tend to operate within their own environment.
- ✦ AI Agents:
- Are designed to interface with various systems and APIs:
- Access your email or calendar
- Interact with databases
- Control other software or devices
- ✦ The core idea of agents is to use a language model to choose a sequence of actions to take.
- ✦ In chains or pipeline, a sequence of actions (or prompts) is hardcoded (in code).
- ✦ In agents, a language model is used as a reasoning engine to determine which actions to take and in which order.
We have discussed
Prompt Chainingin 4. Prompts Chaining - Chaining Together Multiple Prompts
2 Overview of the Key Components of an AI Agent
A single AI agent’s architecture encompasses the essential components that empower it to think, plan, and act within its environment. This sophisticated design typically includes:
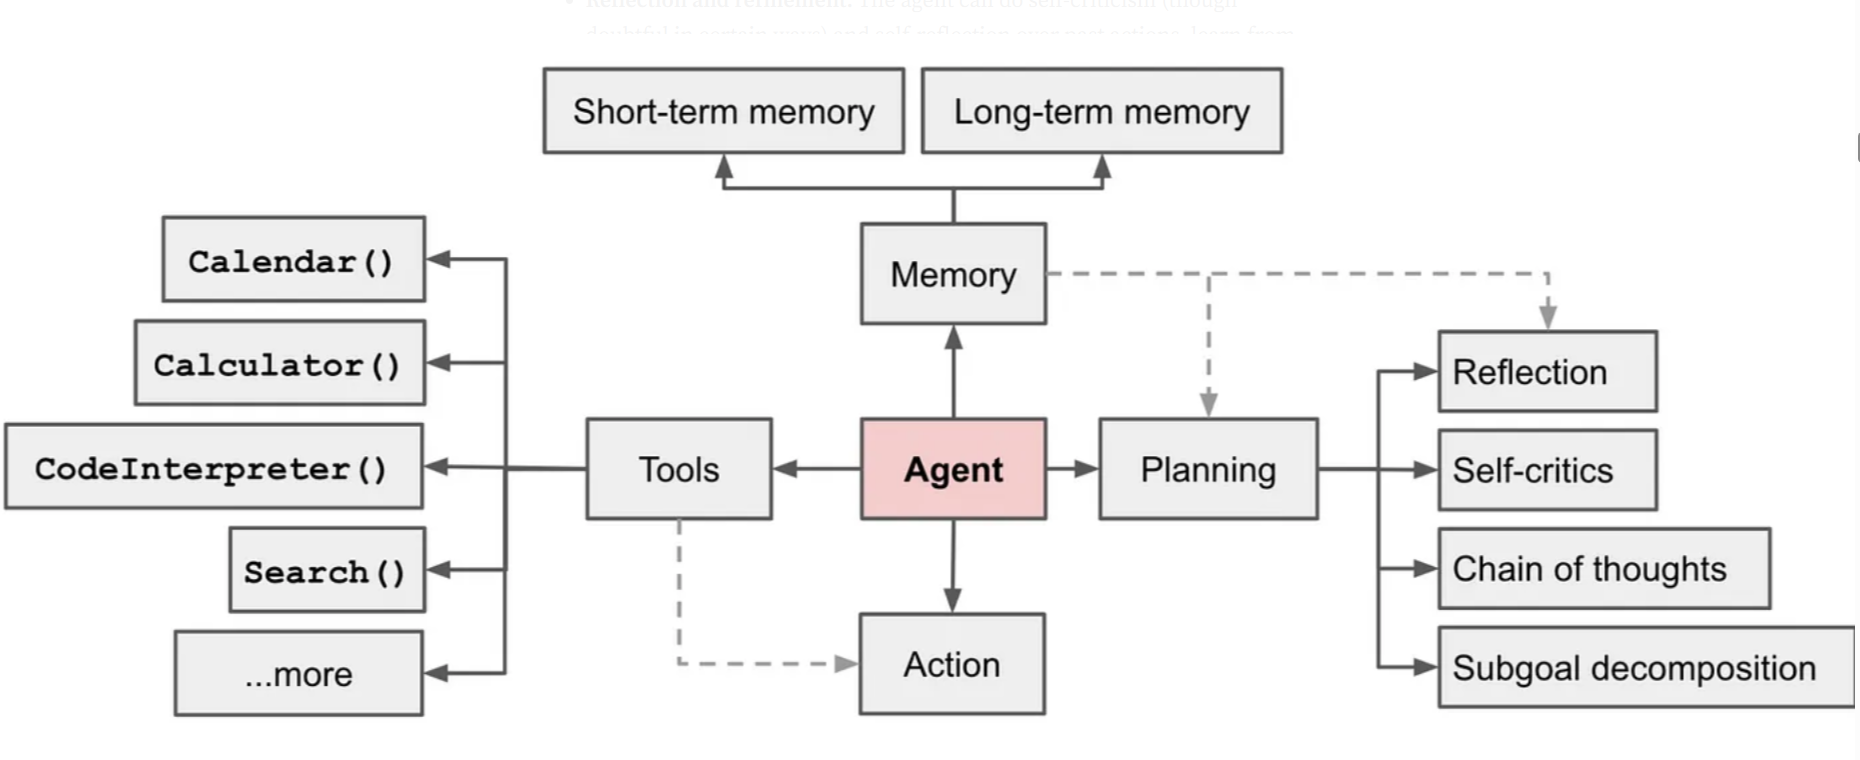
Tools
- ✦ The agent learns to call external APIs or tools for extra information/context or capability that might be missing in the model weights (often hard to change after pre-training).
- ✦ This includes things like current information, mathematical engines, code execution capability, access to proprietary information sources, and many more.
Memory
- ✦ Short-term memory:
- In-context learning (See Prompt Engineering) can be thought of as utilizing short-term memory of the model to operate on a given problem. The context length window can be thought of as Short-term memory.
- ✦ Long-term memory:
- Providing the agent with the capability to retain and recall (infinite) information over extended periods, often by leveraging an external vector store and fast retrieval. The Retrieval part in RAG can be thought of as Long-term memory.
Planning
- ✦ Subgoal & task decomposition:
- The agent breaks down larger tasks into smaller, manageable subgoals, enabling efficient handling of complex tasks.
- ✦ Reflection and refinement:
- The agent can do self-criticism (though doubtful in certain ways) and self-reflection over past actions, learn from mistakes, and refine them for future steps, thus improving the final results.
Together, these elements create an intelligent system that can autonomously solve problems. An AI agent can analyze an issue, devise a step-by-step plan, and confidently execute it, making it a transformative force in the world of artificial intelligence. Below is one example of a more detailed architecture of an AI Agent system.
3 Pitfalls & Challenges of Multi-Agent Systems
However, the development and implementation of multi-agent systems come with their own set of challenges and risks.
3.1 High Token Usage
Notably, the increased complexity of Agentic systems often results in longer response times and higher API costs, which could be a significant drawback for various applications.
- ✦ An agentic system often makes a large number of calls to answer a single/simple question, accumulating tokens for each query made to LLM.
- ✦ Not only is this costly, it introduces latency.
- ✦ Token generation is still a relatively slow process, most (not all) of the latency in LLM-based applications comes from generating output tokens.
- ✦ Calling an LLM repeatedly and asking it to provide thoughts/observations, we end up generating a lot of output tokens (cost) resulting in high latency (degraded user experience).
Fortunately, there are promising advancements on the horizon aimed at mitigating these issues. These include the emergence of smaller, specialized, and faster models, reduced API costs per token, and innovative hardware solutions like language processing units (LPUs) from companies such as Groq, which offer remarkable improvements in inference speed. As the field continues to evolve, it will be interesting to see what additional hardware advancements emerge to address these challenges.
3.2 Non-Deterministic
A more significant problem with AI agents is that LLMs are non-deterministic.
- ✦ While beneficial for idea generation, this poses a serious challenge in scenarios requiring predictability.
- ✦ For instance, if we’re writing an LLM-backed chat application to make SQL queries (Text2SQL), we want high predictability
To address this challenge, we can create a process to iteratively reflect and refine the execution plan based on past actions and observations. The goal is to correct and improve on past mistakes which helps to improve the quality of final results.
4 Do You Actually Need An Agent?
Here are three criteria to determine whether you might need an agent:
-
✦ Does your application follow an iterative flow based on incoming data?
- If your application processes data in a cyclical manner, where each iteration builds upon the previous one, it may be a strong candidate for an agent-based approach.
- Agents can effectively manage and respond to new information as it arrives, allowing for continuous improvement and refinement of outputs.
- This is particularly useful in scenarios like data analysis, where insights evolve as more data is processed.
-
✦ Does your application need to adapt and follow different flows based on previously taken actions or feedback along the way?
- Applications that require dynamic decision-making based on past interactions or user feedback can greatly benefit from agents.
- An agent can track the history of actions and outcomes, enabling it to adjust its strategy in real-time.
- This adaptability is crucial in environments where user preferences or external conditions change frequently
-
✦ Is there a state space of actions that can be taken?
- If your application involves a complex set of possible actions that can be executed in various sequences, rather than a simple linear pathway, it may require an agent to navigate this state space effectively.
- Agents can explore multiple pathways and make decisions based on the current state, optimizing for the best outcomes.
- This is particularly relevant in scenarios like game development, robotics, or any system where multiple strategies can lead to different results.
5 Common Frameworks or Tools for Building Multi-Agent System
5.1 Autogen

AutoGen is an open-source framework developed by Microsoft, designed to facilitate multi-agent collaboration through conversational agents. It excels in enabling agents to work together on complex tasks by leveraging large language models (LLMs).
It supports diverse conversation patterns with conversable agents that integrate large language models (LLMs), tools, and human inputs. It provides a collection of working systems with different complexities. These systems span a wide range of applications from various domains and complexities. This demonstrates how AutoGen can easily support diverse conversation patterns.
AutoGen’s flexibility allows for the creation of complex workflows and problem-solving scenarios, making it particularly attractive for developers and researchers looking to push the boundaries of AI agent capabilities.
5.2 CrewAI

CrewAI is another open-source framework that emphasizes structured workflows and role-based task automation within a collaborative environment.
CrewAI adopts a different strategy by providing a structured platform for the creation and management of AI agents. This framework enables users to define agents with specific roles, objectives, and narratives, promoting a role-playing approach to task automation.
Built on LangChain, CrewAI takes advantage of a comprehensive ecosystem of tools and integrations, making it accessible to a wider audience, including business users who may lack extensive technical knowledge.
CrewAI takes a more accessible approach, offering a user-friendly interface that reduces the need for extensive coding.
5.3 LangGraph
.gif)
LangGraph is a framework that focuses on creating graph-based multi-agent systems. It is designed to handle complex interactions and dependencies between agents.
LangGraph utilizes a graph structure to manage agent interactions and dependencies. The framework focuses on scalability, allowing it to efficiently handles large-scale multi-agent systems.
5.4 Comparing the Three Frameworks
-
✦ Core Focus: AutoGen emphasizes multi-agent conversations and LLM inference, CrewAI focuses on structured workflows and role-based task automation, while LangGraph leverages a graph-based architecture for managing complex interactions.
-
✦ Customization: AutoGen offers extensive customization options for developers, CrewAI provides a user-friendly approach accessible to those with limited technical expertise, and LangGraph allows for highly specialized agent creation.
-
✦ Scalability: LangGraph excels in handling large-scale systems, while AutoGen and CrewAI are more suited for smaller to medium-sized applications.
- User-friendly and Quick Experimentation: CrewAI offers an intuitive interface that allows users to easily experiment with multi-agent systems without requiring extensive technical knowledge.
- Support for a Variety of Tools: CrewAI is compatible with a wide range of tools, including both
LangChainandLlama Indextools. This flexibility means that we are not limited to the tools that CrewAI comes with, but can also leverage a diverse array of tools from other packages. - Structured Workflows and Role-based Task Automation: CrewAI facilitates the creation of structured workflows and enables role-based task automation, which seemingly more relevant to wide variety of use cases.
6 Agentic System and the Future
McKinsey’s most recent “State of AI” survey found that more than 72 percent of companies surveyed are deploying AI solutions, with a growing interest in GenAI. Given that activity, it would not be surprising to see companies begin to incorporate frontier technologies such as agents into their planning processes and future AI road maps. Agent-driven automation remains an exciting proposition, with the potential to revolutionize whole industries, bringing a new speed of action to work. That said, the technology is still in its early stages, and there is much development required before its full capabilities can be realized.
icon: LiWrenchTitle: A More Secure way to Store Credentials
- Towards AI Agents
- More Secure way to Store Credentials
- Writing & Running Python Scripts
- Hands-on Walkthrough and Tasks
- Create Multi-Agent Systems with CrewAI

The "getpass()" function
After getting familiar with Jupyter Notebook, especially Google Colab that is hosted remotely on a server, you would realize that it is very dangerous to specify our API key in the notebook or script.
What we have been using until this point is to rely on the getpass() function to allow users (in fact us), to input the API Key and store the value into a variable, shown below.
from openai import OpenAI
from getpass import getpass
openai_key = getpass("Enter your API Key:")
client = OpenAI(api_key=openai_key)
This method helps keep the key secure by not hardcoding it into the script, which could be accidentally shared or exposed.
- Unauthorized Access:
- If the notebook or script is shared or stored in a repository, anyone can use your API key to access the associated services, potentially leading to data breaches or abuse of the service.
- Code Leakage:
- If the code is accidentally leaked or published, your API key becomes compromised.
- Hard to maintain:
- Imagine you have a key that is being shared by 10 applications. What happens if the key expires and you need to replace all the keys with the new one.
Where "getpass()" no longer works
While the getpass() method helps keep the key secure by not hardcoding it into the script which which could be accidentally shared or exposed, this method is not suitable for scenarios where the Python script or application needs to run autonomously, without human interaction, such as:
- Automated scripts or applications: If your script is part of a larger application or a scheduled task that runs automatically, there won't be a user present to input the API key each time it runs. This makes
getpass()impractical. - Web applications or services: For applications deployed on a server to provide services over the web, requiring manual input of an API key upon each restart or deployment is not feasible. These applications often need to start and operate without human intervention.
- Containerized applications: Applications deployed using containers (e.g., Docker) in cloud environments are designed to be easily replicated and scaled. Requiring manual input for each container instance is not practical.
- Development and testing environments: In environments where continuous integration/continuous deployment (CI/CD) practices are followed, the deployment process is automated, and manual steps like entering an API key each time the application is tested or deployed are not suitable.
Securely Managing API Keys & Credentials with "Environment Variables"
When building an application, the app may require access to a variety of APIs and other services, such as Google Sheet, AWS account, or Telegram messages. All these access would require some forms of credentials (i.e., username and password pair, API key).
Think of an environment variable as a special, secure place on your computer or server where you can store these credentials Your Python scripts or applications can access the credentials, such as the OpenAI API key, when they need to access the services, but the credentials aren't visible to anyone just looking through the code.
One way to set the environment variable is through a configuration file (.env).
What is a .env File?
- ✦ A
.envfile is a simple text file used to store configuration settings, environment variables, and other key-value pairs related to a Python project. - ✦ It typically contains sensitive information such as API keys, database credentials, or configuration settings.
- ✦ Unlike hardcoding these values directly into your source code, you store them in a
.envfile, which is loaded into the project's environment during runtime. - ✦ using
.envfiles in Python ensures secure management of sensitive information and allows for flexible configuration across different environments. - ✦ It's a best practice for maintaining security and scalability in your projects! 🛡️🐍
Why Use a .env File?
- ✦ Security:
- By keeping sensitive data separate from your codebase, you reduce the risk of accidentally exposing it.
- ✦ Organization:
- It provides a systematic way to manage project-specific variables.
- ✦ Flexibility:
- You can easily switch between different configurations (development, testing, production) by modifying the
.envfile.
- You can easily switch between different configurations (development, testing, production) by modifying the
How to Create and Use a .env File:
- ✦ Step 1: Create the
.envFile:- In your project directory, create a file named
.envat the root level. - This is where you'll store your configuration settings and sensitive information.
- Define key-value pairs in your
.envfile, for exampe:
- In your project directory, create a file named
KEY="<my_OpenAI_Key>"
- ✦ Step 2: Install the Module:
- Install the
python-dotenvlibrary using the following command:
- Install the
pip install python-dotenv
- ✦ Step 3: Access the
.envFile in Your Python Code:- Import the
dotenvmodule in your Python code. - Use
load_dotenv()to load variables from the.envfile. - Access the values using
os.getenv("KEY")for each key-value pair defined in the.envfile. Example:
```Python import os from dotenv import load_dotenv load_dotenv() print(os.getenv("KEY")) ``` - Import the
icon: LiWrenchWriting & Running Python Scripts
- Towards AI Agents
- More Secure way to Store Credentials
- Writing & Running Python Scripts
- Hands-on Walkthrough and Tasks
- Create Multi-Agent Systems with CrewAI
What is Python Script
A Python script is a file containing Python code that is intended to be directly executed.
- ✦ Unlike
Jupyter Notebooks, which allow for an interactive coding experience with immediate feedback for each cell, Python scripts are run from start to finish by the Python interpreter. - ✦ Scripts are ideal for projects and tasks that require automation or when deploying applications.
Checking Python Installation
-
✦ This is a quick way to check if your Python has been installed correctly
-
✦ Open your terminal (Command Prompt on Windows, Terminal on macOS and Linux) and type:
python --version
-
✦ This command should return the version of Python installed.
Writing Python Script
"Hello World" Script
-
✦ Open up your Visual Studio Code
- Choose a folder where you want to save your project
- Choose a folder where you want to save your project
-
✦ Let's create a simple script that prints "Hello, World!".
- Click on the "New File"

- Give the file a name. Here, we use
hello_world. Note that Python Scripts must have the.pyextension.
- Write the following code in the editor and run it
print("Hello, World!")
- Click on the "New File"
-
✦ If you can see the output "Hello World" being printed out in the "Terminal", that's good news. That means that your Visual Studio and Python are configured properly and you're good to start with writing your python code.
Structure of a Python Script
A well-structured Python script not only makes your code more readable and maintainable but also adheres to the conventions that Python developers expect. This section will guide you through the essential components and good practices for structuring your Python scripts.
1. Import Statements
All import statements should be at the top of the file.
- ✦ This convention makes it clear which modules the script depends on, facilitating maintenance and avoiding unexpected errors due to late imports.
- ✦ Standard library imports should be grouped together, followed by third-party imports, and then any local module imports, each group separated by a blank line.
import os
import sys
import requests
2. Global Variables
Define global variables after the import statements. These are variables that are meant to be used throughout the script.
MEASUREMENT_UNIT = "cm"
3. Function and Class Definitions
Next, define your functions and classes. Each should have a descriptive docstring (see the first line of string enclosed in triple quotes) explaining what it does. Keep related functions and classes close to each other in the code.
def calculate_area(length, width):
"""Calculate and return the area of a rectangle."""
return length * width
4. Main Function
It's a good practice to encapsulate the script's main functionality in a function, often named main(). This function will be called when the script is executed directly.
def main():
"""Main function of the script."""
length = float(input("Enter the length: "))
width = float(input("Enter the width: "))
area = calculate_area(length, width)
print(f"The area of the rectangle is: {area} {MEASUREMENT_UNIT}")
5. if __name__ == "__main__": Statement
- ✦ At the bottom of the script, use the
if __name__ == "__main__":statement to check whether the script is being run directly or imported as a module. - ✦ If the script is run directly, this condition is
True, and you can call themain()function or any other code you want to execute. - ✦ This practice not only makes your script executable as a standalone program but also allows its functions and classes to be imported into other scripts without executing the main code block.
if __name__ == "__main__":
# if the script is run directly
# e.g. python myscript.py
# Then the main() function will be called
main()
This is how the complete script looks like:
import os
import sys
import requests
MEASUREMENT_UNIT = "cm"
def calculate_area(length, width):
"""Calculate and return the area of a rectangle."""
return length * width
def main():
"""Main function of the script."""
length = float(input("Enter the length in cm: "))
width = float(input("Enter the width in cm: "))
area = calculate_area(length, width)
print(f"The area of the rectangle is: {area} {MEASUREMENT_UNIT}")
if __name__ == "__main__":
main()
Some Good Practice for Scripts
- ✦ Use Comments:
- Comments (
#) are crucial for making your code understandable to others and your future self.
- Comments (
- ✦ Follow Naming Conventions:
- Use meaningful variable and function names. Python convention is to use
snake_casefor variable and function names.
- Use meaningful variable and function names. Python convention is to use
- ✦ Modularize Your Code:
- Break your code into functions or modules for better readability and reusability.
- ✦ Error Handling:
- Use
tryandexceptblocks to handle potential errors in your scripts. - See our guide on 5. A Gentle Intro to Exception Handling in Python
- Use
# [Extra] Further Readings

- This resource covers:
- 11 Beginner Tips for Learning Python Programming
- Writing Comments in Python (Guide)
- How to Write Beautiful Python Code With PEP 8
- Getting Started With Python IDLE
- Interacting With Python
- Your Guide to the Python print() Function
- Understanding the Python Traceback
- Invalid Syntax in Python: Common Reasons for SyntaxError
- Python Exceptions: An Introduction
- Strings and Character Data in Python
- Variables in Python
- Unicode & Character Encodings in Python: A Painless Guide
- PEP 8 — the Style Guide for Python Code
- Python Type Checking (Guide)
- Writing Comments in Python (Guide)
- Documenting Python Code: A Complete Guide
icon: RiCodeBoxLineTitle: Hands-on Walkthrough and Tasks
- Towards AI Agents
- More Secure way to Store Credentials
- Writing & Running Python Scripts
- Hands-on Walkthrough and Tasks
- Create Multi-Agent Systems with CrewAI
This week, we will take a slightly different approach.
Instead of overwhelming you with the concepts and intricate details of CrewAI, we will explore the walkthrough notebook titled "Getting Started with Multi-Agent Systems using CrewAI."
We believe that by engaging with this hands-on experience first, you will be better equipped to appreciate and relate the theoretical concepts and details when you revisit them later.
However, please ensure you have completed 2. A More Secure way to Store Credentials and 3. Writing & Running Python Scripts first. This is especially true, if you are not familiar with these topics.
Download the Notebook and Follow Along
- 👆🏽 Click on the "Open Notebook" button below to open the Jupyter Notebook
-
✦ This notebook contains pre-populated code for you to execute cell by cell.
- Working through it will help you solidify key concepts and techniques covered in the previous sections of this current topic..
-
✦ Here's how to use this notebook:
- Run each cell in order. Pay close attention to the code and the outputs it produces.
- Compare the outputs to your understanding. Do the results align with what you learned from the conceptual topics and notes? If not, revisit the relevant material or ask clarifying questions.
- Experiment! Once you've gone through the notebook once, don't stop there! Try these approaches to deepen your learning:
- Change the inputs: Modify the data, parameters, or prompts used in the code cells. How do these changes affect the outputs?
- Tweak the code itself: Experiment with small modifications to the provided code. Can you make it more efficient, add new functionality, or adapt it to a slightly different task? Active experimentation is the best way to master these concepts.
Complete the Part 2 of the Notebook with Your Own Code
[ Optional ] Share Your Work and Get Feedback from the Community
-
✦ While there is no submission required, we encourage you to share your solutions with your peers by pasting your link into the Sharing Board.
-
Feedback: By sharing your solutions, you can get insights, suggestions, and constructive criticism from your peers. This feedback can help you improve your approach and learn from others’ perspectives.
-
Learning from Peers: Since everyone may have different ways of solving problems, participating in these sessions allows you to see various approaches. You can learn alternative methods, explore different techniques, and gain a deeper understanding of the challenges.
-
-
✦ URL: https://miro.com/app/board/uXjVKojBjec=/?share_link_id=989058465513
-
✦ Passcode:
abc-2024